Wednesday, August 31, 2011

Pork Paranoia


Don't let the picture fool you. This dish was not quite as delicious as it looks. It's not the fault of the recipe, and it's certainly not the source. America's Test Kitchen rarely gets it wrong, and when one of their dishes comes out less-than-perfect I have to assume it was somehow my fault. And given my main ingredient, I'm definitely inclined to think that I'm the one who screwed up.

See, I have a rocky relationship with pork. In fact, it may be the reason why Bill is continually amazed by my kitchen successes today. One of the first meals I ever made for him was pork chops and it did not go well. They were flavorless, dry, and all-around gross. Clearly, they did not have the effect of Engagement Chicken ... or Chicken a la King! And since then, they've been pretty hit or miss for me.

I've had a handful of successful pork dishes, like my favorite barbecued pork, and a scrumptious roast I made several months ago. But I frequently encounter the same speed bump in pulling it off perfectly every time ... too often, my pork is over-cooked and dry. And this most likely occurs because I'm terrified of still-pink pork hitting my dinner toble!

Unfortunately, I had another dry debacle with this dish the other night. In fact, I fear I pulled off something the judges on Chopped might declare "inedible." At least the rice was a huge success! I'll just need to work on my under-cooked pork paranoia.

Skillet Pork Chops and Rice
Ingredients:
4 tablespoons butter
2 tablespoons parsley
2 1/4 cups chicken broth
1 cup long grain white rice
4 boneless pork chops
Salt and pepper
1 onion, chopped fine
1 clove garlic, minced
1/2 teaspoon dried thyme

Directions:
Combine 2 tablespoons butter and parsley in a small bowl and set aside. Microwave 1 cup broth and rice in covered bowl until liquid is absorbed, 6 to 8 minutes.

Pat pork chops dry and season both sides with salt and pepper. Melt 1 tablespoon butter in a 12-inch skillet over medium-high heat. Brown chops, 3 to 4 minutes per side. Transfer to plate and tent loosely with foil. Melt remaining 1 tablespoon butter in now-empty skillet over medium-high heat. Cook onion until browned, 6 to 8 minutes. Add garlic and thyme and cook until fragrant, about 30 seconds.

Stir in parcooked rice and remaining 1 1/4 cups broth and bring to a boil. Return pork chops and any accumulated juices to skillet and cook, covered, over medium-low heat until pork registers 145 degrees and rice is tender, 12 to 15 minutes. Serve pork with reserved parsley butter.

Monday, August 29, 2011

Savor the Sour(dough)!

In eight years, I feel like I've adapted to the Midwest pretty well. I admit that I had a hard time of it at first, but I've come to love (almost) all things Milwaukee. I've learned to appreciate cheese beyond Kraft singles. I've discovered that there's more to sausage than Ballpark hot dogs. I've come to crave frozen custard on a level that far exceeds ice cream. And yes, I've even acquired a taste for some beer.

But as a native San Franciscan, there are a couple things from home that I'll never, ever be able to replace. The first is Giants baseball (sorry, Brewers fans) and the second is sourdough bread. I don't want to talk about the fact that the Giants are four games back in the NL West right now (no need to rub it in, Brewers fans), so let's talk sourdough instead.

See, the relationship between sourdough and San Francisco is like the perfect harmony between peanut butter and jelly. You can't really have one without the other. Like meatballs and spaghetti. Or burgers and fries. Or Paula Deen and butter. Sourdough anywhere else just simply isn't sourdough.

Given this, I've always wondered how sourdough, started on my own, would behave in Milwaukee. Well, I didn't technically start it on my own, but I did put sourdough to the test this weekend.

I've probably mentioned Boudin, San Francisco's original, and arguably most authentic, sourdough bread on more than one occasion. On one of those recent occasions, my co-worker Dave said, "I make sourdough pancakes for my kids every weekend." Excuse me? Sourdough pancakes? Where have you been my whole life? Even hailing from the great City by the Bay, I've never had a sourdough pancake. And until this co-worker shared his starter with me, my life was not complete!

Since that fateful day when Dave delivered that little jar to my desk, I've researched starting sourdough and all of the other delicious things you can do with it. Unfortunately, I've yet to come up with a definitive "this is the best way to start starter" source, so I'm going to refrain from linking to any of them right now. But suffice to say the process goes something like this: Combine flour and water (or maybe milk), and possibly some sugar. Let it sit on the kitchen counter for a few days, stirring regularly. When it smells funky, it's probably ready to go into the fridge. Add it to your favorite recipe, like the pancakes below, and continue feeding it weekly.

That's obviously not a tried and true method, so don't do that at home. But once I've worked it out for sure, I'll let you know. Until then, I'll be taking advantage of Dave's starter (which has apparently been going strong for several years!). You can read about to my new weekend ritual ... and maybe a few sourdough variations in the weeks to come!

If you're a local friend, I'd be happy to share some of my starter with you. This recipe makes a big batch, and there's no way Bill and I can eat so many pancakes every weekend (even if Bill did declare them the most delicious pancakes he's ever had!). Just leave me a comment, shoot me an email, or tweet me a tweet (@jenmabey), and I'll gladly set some starter aside!

Sourdough Pancakes
Ingredients:
1/3 cup sourdough starter
2 cups flour
2 cups milk
2 eggs
3 tablespoons vegetable oil
2 teaspoons baking soda

Directions:
The Night Before
Remove sourdough starter from fridge and allow to come to room temperature, 3 to 4 hours. In a large bowl, whisk together starter, flour, and milk. Cover bowl with a kitchen towel and allow to sit in a warm place overnight.

In the Morning
Uncover starter mixture (it should have risen and be somewhat bubbly) and whisk well. Remove 1/3 cup of starter, place in a jar, and put back in the fridge. Whisk in eggs, one at a time. Whisk in vegetable oil and baking soda.

Heat griddle over medium-low heat (it's ready when a few drops of water bubble and disappear when splashed on the surface). Spray with cooking spray. Ladle liberal amounts of pancake batter onto griddle and cook, about 1 minute per side. Savor the sour!

Sunday, August 28, 2011

Or-e-o-my!

I haven't had an Oreo cookie since I-don't-know-when. But they sure do conjure up fond memories. See, despite the fact that my mom always packed me a wholesome lunch and fed me a well-rounded dinner, she used to let me eat dessert for breakfast. Shocking, I know, and probably why I have such a sweet tooth today. I'd scoff at a parent doing this now, but at the time I thought she was the best mom ever!

Oreos became one of my favorites as a kid, and with a big glass of milk they could almost pass as breakfast. Whether you like to twist them, lick them, dunk them or just eat them in one big bite, I think we can all agree that the allure of the Oreo is irresistible. It's probably why I had a hankering for a deep fried Oreo at the State Fair a few weeks ago. I chickened out at the Fair (as I have so many other years when I've said I'd have a deep fried Oreo), but a week later I still had that craving. And that's when I started wondering if I could make them myself (because buying a bag at the store would just be too easy).

I ended up forgetting all about this as I was consumed with other stuff last week (like winning the America's Test Kitchen Macaroni and Cheese Blogger Challenge, thank-you-very-much!), but I stumbled across this awesome blog on Friday night and my jaw dropped when I saw the post on Oreos from scratch. I just couldn't resist, so I made them right away on Saturday morning. And boy, oh boy, oh boy, am I glad I did! As the blog claimed, they're even better than the real thing!

I had just one minor problem with this recipe, which I think I may be able to remedy with a slight tweak. While the cookies were perfectly-sized circles headed into the oven, they ended up spreading and made super-sized Oreos. That's fine, but had they held their shape they would have looked and tasted like the real thing. Usually, spreading occurs as a result of too much butter so next time I make this (and there WILL be a next time!) I'll either omit a little butter or add a little flour. The cooking time was also somewhat tricky, as my 9-minute batch yieled super crisp but very brown cookies and my 8-minute batch yielded still sort of chewy cookies. I prefer the super crispy batch, but it would have been nice to reach a happy medium. Regardless, I'm totally addicted now. In fact, I might go eat one right now!

Experimenting with my new foam board display!
Homemade Oreo Cookies
Ingredients:
For Cookies
1 1/4 cups flour
1/2 cup unsweetened cocoa powder
1 teaspoon baking soda
1/4 teaspoon baking powder
1/4 teaspoon salt
1 cup sugar
1/2 cup plus 2 tablespoons butter, at room temperature
1 egg
Cooking spray (for greasing and cookie-flattening)

For Filling
1/4 cup butter, at room temperature
2 tablespoons shortening
1 cup confectioners' sugar
1 teaspoon vanilla

Directions:
Preheat oven to 375 degrees.

In a medium bowl, combine flour, cocoa powder, baking soda, baking powder, salt, and sugar. Beat in butter and egg until the dough comes together. (Note: The mixture will appear crumbly at first, but just crank up the speed of your mixer. It will come together into a nice sticky ball after a minute or so.)

Place rounded teaspoons of dough about 2 inches apart on a greased cookie sheet.


Spray the bottom of a small glass with cooking spray and flatten each cookie to about 1/8 inch. (Note: You'll need to repeatedly spray the glass to keep the dough from sticking.)


Using a small round cookie or biscuit cutter, cut each cookie into uniform circles. (Discard scraps ... or nibble on them. We don't judge in this family.)


Bake 8 to 9 minutes. Remove from oven and allow to cool completely on a wire rack.


To prepare filling, beat butter and shortening in a medium bowl. Slowly beat in confectioners' sugar and vanilla (adding more confectioners' sugar as necessary to reach desired consistency ... filling should be thick, almost paste-like).

Spread a tablespoon (or so ... depending on if you like single stuft or double stuft!) of filling over half of cookies. Top with remaining cookies to create sandwiches. Get dunking!

Tuesday, August 23, 2011

Fair Food Phenomenon: Deep Fried Mac and Cheese

Upon moving to Wisconsin nearly eight years ago, I faced the stark realization that I'd been deprived of two very important things as a child: macaroni and cheese, and summer outings to the State Fair.

You see, when I was growing up, I didn't even get the mac and cheese from the infamous blue box. It just wasn't something my mom, a proponent of healthful, homemade dinners, would put on the table. And being a city girl, I couldn't fathom the idea of a State Fair. My idea of livestock was the sea lions at Pier 39, and they were more likely to be observed with a slice of sourdough in your hand than a corn dog.

Now I'm not saying that mac and cheese and State Fairs go hand in hand ... but it turns out they're also not mutually exclusive. In fact, they're downright compatible!

If it's cheesy, deep fried, or served on a stick, you can find it at the Wisconsin State Fair. And the culmination of these three culinary phenomena is a trifecta of Fair food goodness. That's why Deep Fried Mac and Cheese on a stick is my ultimate State Fair dish ... and something I had to recreate at home.

My lack of mac and cheese experience initially made me nervous about this week's Blogger Challenge from America's Test Kitchen. But as I thought about it, I realized that this Challenge afforded me the perfect opportunity to put this recipe to the test. And it turns out that was a pretty darn good idea.

I based my mac and cheese off of the Skillet Macaroni and Cheese recipe from Cook's Country, just scaled back a bit and minus the topping. Then I treated the leftovers as I would any food for frying ... a little seasoned flour, egg wash, and some breadcrumbs. A couple minutes later and voila! Delicious little nuggets of creamy, cheesy, carb-y goodness with just the right amount of crunch!

I had good intentions of threading these deep fried wedges onto wooden skewers to really replicate the State Fair feel, but they didn't last long enough. Bill and I couldn't help but gobble them up as soon as they were cool enough to handle. I should also note that I fried a very small batch. For the sake of our arteries, the remaining mac and cheese is tucked safely away in a casserole dish, waiting to serve as a side on another day.

Before the insanity ensued!
Deep Fried Mac and Cheese
Ingredients:
1 3/4 cups water
3/4 cup evaporated milk
2 cups large elbow macaroni
1/2 teaspoon cornstarch
1 teaspoon hot sauce
2 cups mild cheddar cheese, shredded
Salt and pepper
1 cup vegetable oil, for frying
1/3 cup flour
1/2 teaspoon cayenne
1 egg
1/2 cup breadcrumbs

Directions:
Bring water, 1/2 cup evaporated milk, and 1/4 teaspoon salt to simmer in a skillet over medium-high heat. Add macaroni and cook, stirring often, until pasta is al dente, about 8 minutes.

In a small bowl, whisk remaining evaporated milk, cornstarch, and hot sauce, then stir into skillet. Cook until slightly thickened, about 1 minute. Off heat, stir in cheese, gradually adding water as needed to adjust the consistency of the sauce (I ended up using about 1/3 of a cup). Season with salt and pepper to taste.

Have a helping (because it's best when it's hot and gooey!), place the leftovers in a container, and refrigerate overnight.

The next day, remove the mac and cheese from the fridge and cut a portion (about 1/3 of the leftovers) from the container. Slice into wedges. Place flour in a shallow dish and season with cayenne and salt and pepper. In another shallow dish, whisk egg. Place breadcrumbs in a third shallow dish. Working one wedge at a time, dredge the mac and cheese in flour, then dip it in egg, then coat it in breadcrumbs.

Meanwhile, heat oil in a small saucepan. Oil should be about 370 degrees for frying (but rather than checking the temperature with a thermometer, I just stick the handle of a wooden spoon in the oil and call it ready when small bubbles rise around it). Carefully place 2 or 3 coated mac and cheese wedges in the hot oil and fry, 1 to 2 minutes, turning once for even browning. Use tongs or a slotted spoon to remove wedges to a paper towel-lined plate and repeat with remaining wedges.

Careful! You should allow the mac and cheese wedges to cool for a minute or so before scarfing them down. But good luck with that!

Sunday, August 21, 2011

Tur-Greek-y Burgers

A couple weeks ago, I entered the America's Test Kitchen Blogger Challenge when the theme for the week was burgers. I'm super proud to say that my post ended up in the top four and was excerpted in their Blogger Challenge Recap on The Feed!

I do have to admit, however, that I was a bit of a sore loser when the winner was announced. While the post they chose was quite good, I just couldn't believe the pickle-in-the-middle won out over my Man v. Food inspiration! My hard feelings vanished when I realized I had been a finalist, and I'm even more embarrassed by my initial reaction after the nice email I received from the Test Kitchen intern yesterday. Since I placed in the top four entries, she sent along the judges' feedback, and this is what they had to say about my post:

"Impressive that she was inspired by an episode of Man vs Food - most people would probably protect their arteries, but not this gal. Thumbs up."

"This blog just flowed nicely. Not too long, an easy read, and a relatable story."

"I loved this sentence: 'On the outside, it's an unsuspecting burger. But on the inside my Juicy Lucy is bold and bursting with flavor.' Yum!"

Nice incentive to continue competing, so I have a very special mac and cheese post coming up for the most recent Blogger Challenge :) Be on the lookout!

Now in my first entry, I noted that I was tempted to create a few spin-offs of the Juicy Lucy, including a Greek burger that I thought would be delicious! Because really, what sort of cheese-stuffed patty wouldn't be delicious? I got around to trying this the other night, and the results were just what I suspected ... a yummy burger that was a little bit salty (from the feta), a little bit tangy (from the tzatziki), and a while lot flavorful (from the whole Greek-inspired concoction)!

Even with Bill's complete and total aversion to condiments, he couldn't get enough of this tzatziki sauce (and I'm pretty impressed that I've gotten him to fall in love with turkey burgers!).

Tur-Greek-y Burgers
Ingredients:
For Tzatzkiki Sauce
1/2 medium cucumber, peeled, seeded, and chopped
6 oz. plain Greek yogurt
1/2 tablespoon olive oil
1/2 teaspoon lemon juice
1/4 teaspoon salt
1/2 teaspoon oregano
1 garlic clove

For Burgers
1 lb. ground turkey
2 tablespoons red onion, minced
1 green onion, white and green parts, sliced thin
1 tablespoon Worcestershire sauce
1 teaspoon cayenne
1 teaspoon cumin
Salt and pepper
3 tablespoons crumbled feta cheese
Olive oil, for brushing
3 burger buns
Baby spinach leaves
Red onion slices

Directions:
To prepare the tzatziki sauce, combine all sauce ingredients in a food processor and blend until smooth. Pour into a small bowl, cover, and chill until ready to serve.

To prepare the burgers, combine the turkey, onions, Worcestershire, cayenne, cumin, and salt and pepper in a large bowl. Shape into 6 thin patties. Top 3 patties with feta, then place the plain patties atop the cheese-topped patties, pressing the edges to seal.

When grill is hot, brush the tops of each burger with olive oil and place on grill oiled side down. Brush opposite sides of burgers with oil, and grill 12 to 14 minutes, flipping once or twice. Place buns cut side down on grill and grill until toasted, about 1 minute.

When buns are toasted, place a handful of spinach leaves and a few slices of red onion on the bottom of each bun. Top with burgers. Spoon tzatziki over burgers and top with remaining bun halves. Enjoy!

Tuesday, August 16, 2011

Toss the Store-Bought Sauce!

There are many things that bring me joy in the kitchen, but at the top of my list is discovering that it's outrageously simple (and more delicious!) to make something from scratch that's most often store-bought.

I've made enchiladas a million times. And I believe 999,999 of those times, I used store-bought, canned sauce. It wasn't until a few months ago, when I took a stab at another America's Test Kitchen enchilada recipe, that it even occurred to me that I could make the sauce myself. Well, that recipe was just ok. And given that it was an enchilada casserole recipe, the sauce wasn't really a standout star. But last night, when I was looking for a way to use up my leftover rotisserie chicken from the rustic tart I'd made the night before, I came across another Test Kitchen recipe with a slightly different twist on from-scratch enchilada sauce.

I hate it when people describe the flavors of a dish as "complex" because I think it makes them sound like complete and total food snobs. But I'm afraid I'm at a loss for a more appropriate term to explain this sauce. It's rich, it's spicy, and it has an awesome, thick texture that lingers on your tongue (in a good way, not a weird way!). It's almost reminiscent of a mole sauce, though it's clearly not!

Just try it. Once you go homemade, you'll never need store aid!

Chicken Enchiladas with Homemade Enchilada Sauce
Ingredients:
For Sauce
1 tablespoon vegetable oil
1 small onion, minced
Salt and pepper
2 tablespoons chili powder
2 garlic cloves, minced
1 1/2 teaspoons cumin
1 1/2 teaspoons sugar
1 1/2 cups canned tomato sauce
1/4 cup water

For Enchiladas
2 cups cooked chicken, shredded
1 3/4 cups Homemade Enchilada Sauce
1 cup shredded Jack or Mexican-blend cheese
1 tablespoon chipotle pepper in adobo, minced
1 green onion, sliced thin
6 flour tortillas, warmed

Directions:
To make sauce, heat oil in 10-inch skillet over medium heat until shimmering. Add onion and 1/2 teaspoon salt and cook until softened, about 5 minutes. Stir in chili powder, garlic, cumin, and sugar and cook until fragrant, about 30 seconds. Stir in tomato sauce and water, bring to a simmer, and cook until slightly thickened, about 3 minutes. Season with salt and pepper to taste.

To prepare enchiladas, adjust oven rack to middle position and heat oven to 350 degrees. Combine shredded chicken, 1/2 cup sauce, 1/2 cup cheese, chipotle pepper, and half of the green onion in bowl.

Spread 1/4 cup sauce over the bottom of an 8-inch square baking dish. Spread tortillas on a clean counter and spoon 1/3 cup chicken filling down the center of each. Tightly roll tortillas around filling and lay, seam side down, in prepared dish.

Pour remaining sauce evenly over enchiladas and top with remaining cheese. Top with remaining green onion slices. Cover baking dish with foil. Bake until enchiladas are heated through, about 15 minutes. Remove foil and continue to bake until cheese is lightly browned, 5 to 10 minutes longer. Remove from oven and allow to cool slightly before serving.

Monday, August 15, 2011

Smart Tart!

To me, a tart conjures up images of sweet and tangy fruit baked into a delicious, crimped pie shell. But clearly I need to broaded my definition because tarts can take a savory form, as well! In another of my favorite Test Kitchen cookbooks, I came across this recipe for Rustic Turkey Tart and though it was pretty ingenius. Obviously, rich, creamy, meaty fillings go just as well with flaky, buttery crusts as fillings that are sticky and sweet. That's why we all love chicken pot pie!

This recipe came from the "One Big Roast, Three Great Meals" chapter. But not having roasted a turkey lately (and not planning on it 'til November!), I substituted rotisserie chicken. Equally delicious, but definitely worth repeating with the proper bird after Thanksgiving!

Rustic Rotisserie Tart
Ingredients:
For Homemade Pie Dough
1 cup flour
1/2 teaspoon salt
2 tablespoons shortening, chilled and cut into pieces
4 tablespoons butter, chilled and cut into pieces
3 to 5 tablespoons ice water
For Tart
1 tablespoon butter
4 oz. mushrooms, sliced
1/2 teaspoon dried thyme
1 tablespoon flour
1/4 cup chicken broth
1/4 cup heavy cream
10 oz. cooked rotisserie chicken, shredded
1 scallion, sliced thin
Salt and pepper
1 recipe Homemade Pie Dough
2 oz. goat cheese, crumbled

Directions:
Process flour and salt together in a food processor until combined. Scatter shortening over top and process until the mixture resembles coarse cornmeal, about 10 seconds. Scatter butter over top and pulse until the mixture resembles coarse crumbs, about 10 pulses. Transfer mixture to a medium bowl.

Sprinkle 3 tablespoons water over the mixture. Using a stiff rubber spatula, stir and press the dough until it sticks together. If the dough does not come together, stir in the remaining water, 1 tablespoon at a time.

Turn the dough onto a counter sprinkled with flour. Shape into a ball and flatten into a 5-inch disk. Wrap with plastic wrap and refrigerate for 1 hour (or up to 2 days). Before rolling out the dough, allow to sit on the counter to softened slightly, about 10 minutes.

Adjust oven rack to middle position and heat oven to 400 degrees.

Melt butter in a 10-inch skillet over medium heat. Add the mushrooms and thyme and cook until the mushrooms release their liquid and begin to brown, 5 to 7 minutes. Stir in flour and cook for 1 minute. Whisk in broth and cream, bring to a simmer, and cook until thickened, about 1 minute. Off the heat, stir in chicken and scallion and season with salt and pepper.

Roll out the dough into a 10-inch round, about 3/8 inch thick, on a lightly floured counter. Transfer the dough to a rimmed baking sheet lined with parchment paper. Spread the chicken filling in the center of the dough, leaving a 1 1/2-inch border, and sprinkle with cheese. Fold the edge of the dough in over the filling, pleating it every 1 to 2 inches as needed.

Bake the tart until the crust is golden and crisp and the filling is heated through, 30 to 35 minutes. Let cool slightly on the baking sheet for 5 minutes before serving.

Sunday, August 14, 2011

Hostess with the Most-est!

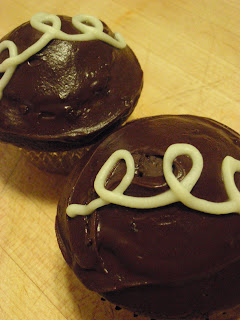
You know 'em. You love 'em. Those delicious chocolate-y, creamy cupcakes with the cute little curlicues piped across the top. That's right, the famous Hostess cupcake!

I have memories of these things in my lunchbox as a kid ... the way to chocolate glaze stretched and the filling spilled over the moist crumbs when you pulled them apart. Yum! But who would have thought that you could create these little treasures at home? Well, America's Test Kitchen, of course! When I found this recipe on The Feed, I couldn't resist (just like I couldn't resist tearing into the plastic wrapper as a kid!). But I never imagined how much BETTER these cupcakes would be homemade!

No joke, these were abolsutely the most delicious chocolate cupcakes I've ever made (and ever eaten!) in my entire life. The cake itself was super moist and produced the perfect crumb, the filling was sweet and smooth, and the glaze was thick, chocolate-y goodness!

Note that I made one minor modification from the Test Kitchen's recipe ... they called for marshmallow fluff in the filling, but something about that didn't sound great to me. I remembered that I have a pumpkin cupcake recipe that has an amazing cream filling, so I decided to use that instead! The result? Perfect filling without the mystery marshmallow mix!

These cupcakes leave those plastic-wrapped cakes in the dust! Pack these in your lunchbox and I guarantee you'll thank me :)

Chocolate Cream-Filled Cupcakes
Ingredients:
For Cupcakes
1 cup flour
1/2 teaspoon baking soda
1/4 teaspoon salt
1/2 cup boiling water
1/3 cup cocoa powder
1/3 cup semisweet chocolate chips
3/4 cup sugar
1/2 cup sour cream
1/2 cup vegetable oil
2 eggs
1 teaspoon vanilla

For Filling
1/2 tablespoon cornstarch
1/2 cup milk
1/4 cup shortening
2 tablespoons butter, softened
1 cup confectioners' sugar

For Glaze
1/2 cup semisweet chocolate chips
4 tablespoons butter
1/4 cup white chocolate chips

Directions:
Adjust oven rack to middle position and heat oven to 325 degrees. Line a 12-cup muffin tin with foil or paper liners.

Combine flour, baking soda, and salt in a bowl. In another bowl, whisk water, cocoa, and chocolate chips until smooth. Add sugar, sour cream, oil, eggs, and vanilla and mix until combined. Whisk in flour mixture until incorporated. Divide batter evenly among muffin cups. Bake until toothpick inserted in center of cupcakes comes out clean, about 18 minutes. Cool cupcakes in tin 10 minutes, then remove to wire rack and cool completely.

To prepare filling, combine cornstarch and milk in a small saucepan until smooth. Bring to a boil, stirring constantly. Remove from heat and cool to room temperature. In a large bowl, cream shortening, butter, and confectioners' sugar until light and fluffy. Gradually add cornstarch mixture and beat until smooth.

Using a sharp knife, cut a 1-inch circle about 1-inch deep in the center of each cupcake. Carefully remove tops and set aside. Spoon or pipe filling into cupcakes. Replace tops.

To prepare chocolate glaze, microwave chocolate chips and 3 tablespoons butter in a small bowl, stirring occasionally, until smooth, about 30 seconds. Cool glaze to room temperature, about 10 minutes. Frost each cupcake with 2 teaspoons cooled glaze.

To prepare white glaze, microwave white chips and remaining tablespoon butter in a small bowl, stirring occasionally, until smooth, about 30 seconds. Cool glaze to room temperature, about 10 minutes. Spoon cool filling into small zip top bag, snip a small point from the end, and pipe curlicues on the top of each cupcake.

Wednesday, August 10, 2011

Chicken Fit for a ... Bill

You know Glamour magazine's Engagement Chicken? The simple roast chicken recipe that women claim they made shortly before their boyfriends proposed? Well I never bought it. I assumed those stories were either big, fat coincidences or flat-out lies. Sure, the average guy would tell you he'd like his future wife to be a good cook. But I've always doubted that a single good meal would make their decision.

Until I made this Chicken a la King for Bill on Monday night. I swear that if we weren't already married, we'd have been marching down the aisle immediately following this meal. His reaction was that strong. He hasn't stopped talking about it since. He even called by mother to rave about it. Seriously!

Naturally, it's another recipe from America's Test Kitchen ... and that's typically a guaranteed win. I can't quite put my finger on what made this dish so amazing. It could have been the juiciness of the chicken, assisted by the brine-like marinade. Or it could have been the richness of the sauce, made all the more so by the marsala wine. Or maybe it was the perfectly toasted sourdough slices ... straight from San Francisco! (That's right, I have a very expensive habit of ordering Boudin sourdough bread online. It's one of the things that makes me most homesick.)

Whatever it was, the Test Kitchen definitely did this retro-inspired dish justice, without the aid of condensed soup!

Chicken a la King
Ingredients:
3/4 cup heavy cream
1 tablespoon lemon juice
Salt
3 boneless, skinless chicken breasts, cut into 1-inch pieces
1 tablespoon vegetable oil
1 onion, chopped fine
1 cup sliced baby bella mushrooms
1 red bell pepper, seeded and chopped fine
1/4 teaspoon pepper
3 tablespoons flour
1/2 cup marsala wine
1 1/2 cups chicken or beef broth
6 slices Italian or sourdough bread, buttered and toasted (see below)

Directions:
Whisk 1/2 cup cream, lemon juice, and 1 teaspoon salt in a bowl. Add chicken, cover, and refrigerate 30 minutes.

Heat oil in a large skillet over medium-high heat until shimmering. Cook onion until golden, about 3 minutes. Add mushrooms, bell peppers, 1/4 teaspoon salt, and pepper and cook until vegetables have softened, about 5 minutes. Stir in flour and cook 1 minute. Add marsala, scraping up browned bits with wooden spoon, and cook until thickened, about 1 minute. Add broth and remaining cream and cook until sauce is very thick and spatula leaves trail when dragged through sauce, about 5 minutes.

Stir in chicken mixture and reduce heat to medium-low. Simmer, stirring frequently, until chicken is no longer pink, about 10 minutes. Serve over toasted bread.

Toasted Bread
Adjust oven rack to middle position and heat oven to 400 degrees. Butter both sides of 6, 1-inch thick slices of bread and arrange on baking sheet. Toast until bread is golden brown, about 10 minutes, flipping once halfway through cooking.

Tuesday, August 9, 2011

Pizza Now, Breadsticks Later

I'm a bargain hunter at heart, which means I love a good two-for-one deal. That applies not only to shopping, but also recipes that can help me knock out two meals (or at least a portion of two meals) at once.

When you're cooking recipes meant for four but only feeding two, this tends to happen a lot ... but usually in the form of leftovers. Now sometimes those leftovers can be repurposed into a fabulous second meal. And sometimes they just become a quick lunch. But they rarely manifest into something as delicious as this!

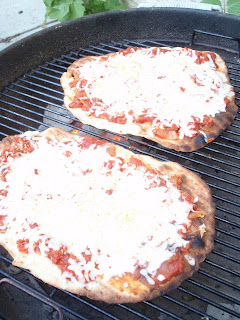
I loved the idea of pizza on the grill from the moment I saw the recipe, but I didn't realize just how simple it was. After all, it involves yeast and yeast is always complicated and time-consuming. Not so when you're dealing with thin crust pizza! This pizza requires absolutely no rising time and yields four personal-sized, deliciously thin, cracker-y crusts. But wait ... Bill and I can't eat four pizzas (truth be told, we couldn't even finish two!). So what to do with that leftover dough?

Well I'm obviously not going to waste it! I hate to waste food almost as much as I love a good deal. So I got to thinking ... if I allowed the remaining dough to rise while we were cooking and enjoying our quick and yummy grilled pizzas, I'd have what amounts to a delicious Italian bread dough. So why not make breadsticks!? Perhaps it's not what America's Test Kitchen had in mind when they developed the recipe, but cooking for two requires a little creativity. And it was certainly a genius accompaniment to the next night's dinner :)

Grilled Pizza ... and Breadsticks!
Ingredients:
1 cup water, heated to 110 degrees
1 tablespoon olive oil (plus additional for brushing dough)
1 tablespoon sugar
1 envelope active dry yeast
2 3/4 cup flour
1/4 cup grated parmesan cheese
1 teaspoon salt
1 cup prepared sauce (I used leftover Basic Tomato Sauce that we had in the freezer)
1 1/2 cups shredded mozzarella cheese

Directions:
In a large measuring cup, combine water, olive oil, sugar, and yeast. Stir until yeast is dissolved. Let st 5 minutes.

In a standing mixer fitted with the dough hook, combine flour, parmesan, and salt. With machine running, slowly pour in water-yeast mixture. Mix until dough forms a ball and begins to pull away from the sides of the bowl, about 1 minute. Turn onto a floured work surface and knead about 3 or 4 times until cohesive.

Divide dough in half. Place half of the dough in a bowl coated with cooking spray and turn to coat. Cover with plastic wrap and set aside in a warm place (like on top of the oven).

Line a rimmed baking sheet with parchment paper. Divide the second half of dough into 2 equal portions. Shape each portion into a ball, flatten into a disk, and roll and stretch dough to form a 9-inch circle. Transfer to baking sheet, seperating each with a layer of parchment.

Prepare grill. Light about 100 coals and spread over half of grill.Set cooking grate in place and heat, covered, with lid vent open completely, for about 5 minutes.

Brush tops of dough with olive oil, then place oiled side down on cool side of grill. Grill 3 to 5 minutes, poking large bubbles with tongs. Brush each lightly with olive oil, then flip. Top each with sauce, then cheese. Grill, covered, until undersides are spotty brown and cheese is melted, about 3 to 5 minutes. Move pizzas to hot side of grill to crsip, about 1 minute. Serve

After pizza, when your dough has had about an hour to rise, preheat oven to 375 degrees. Spray a baking sheet with cooking spray, then dust with cornmeal. Shape remaining dough into breadsticks, place on baking sheet, and bake 12 to 15 minutes, until lightly browned. Cool completely, wrap in plastic wrap, and serve with pasta tomorrow!

Saturday, August 6, 2011

Jen's Juicy Lucy

I've been waiting for weeks for America's Test Kitchen to choose a Blogger Challenge that I felt confident in conquering, and this week it finally came. It was almost like fate ... On Sunday I made some of the most delicious burgers ever grilled, but decided to save the post for another night. Monday morning, I saw @TestKitchen tweet about this week's burger challenge and I felt like I'd experienced divine intervention. Clearly, something was telling me to postpone that post for a reason!

We make a lot of burgers in our house, especially during the summer when my husband basically lives over the grill. While Bill often mimics Bobby Flay, I usually turn to my most trusted source, America's Test Kitchen, for recipe inspiration.

Well, they were certainly on the right track with their Cook's Country All-American Burger, which mixes traditional toppings like bacon and cheese into the meat. But in true Midwest fashion, Minnesota has taken the "contained ingredients" technique a step further. Why have cheese scattered throughout your burger patty when you can take one big, juicy bite and reveal an oozing, cheese-licious center? Thus, I give you the Juicy Lucy.

I was first introduced to the Juicy Lucy with an episode of Man v. Food on the Travel Channel, where Adam Richman visited Minneapolis and two dives both claiming to be the originators of this burger: The 5-8 Club and Matt's Bar. Just a 6-hour drive and my husband and I had a chance to experience this ourselves ... and it was worth the trip! With me and the Juicy Lucy, it was love at first bite.

I know I'm not a Midwest native ... I'm just a humble transplant. But that doesn't mean I can't appreciate the genius of ooey, gooey, oh-so-melty cheese stuffed inside of a burger! In fact, I can't believe you don't see this more often and I can't believe it took an episode of Man v. Food for me to be exposed to this delicacy. Naturally, I needed to perfect it myself (since a 6-hour drive for a burger isn't do-able more than once a year ... although it's tempting). I think I've succeeded in creating something to give the 5-8 and Matt's a run for their money. On the outside it's just an unsuspecting burger. But on the inside my Juicy Lucy is bold and bursting with flavor ... literally!

Jen's Juicy Lucy
Makes 6 burgers
Ingredients:
2 lbs. ground beef
2 teaspoons Worcestershire sauce
2 tablespoons steak seasoning (such as McCormick Grill Mates Montreal Steak)
Salt and pepper
6 slices American cheese
Olive oil, for brushing
6 hamburger buns
Assorted burger toppings

Directions:
In a large bowl, combine beef, Worcestershire, steak seasoning, and salt and pepper. Mix thoroughly with your hands. Divide mixture into 6 equal parts, then shape each sixth into 2 thin patties (about 1/3-inch thick). (For those of you who are mathematically challenged like me, you should now have a total of 12 patties!).

Top 6 of your patties with cheese. (Note that a slice of cheese will likely be too large to be sandwiched between 2 patties. I recommend cutting each slice into fourths and creating little stacks to nestle in the center of each burger.) Place a plain patty atop each cheese-topped patty and pinch the edges together to ensure the cheese is encased by the beef.

Place burgers on a platter and allow to rest in the fridge for about 30 minutes. Meanwhile, prepare your grill.

When coals are ready and grill grate is hot, remove burgers from fridge and brush a small amount of olive oil over both sides of each patty (this is easier - and less dangerous - than greasing the grill!). Grill burgers until well-seared on both sides, about 10 to 12 minutes total. Serve on toasted buns with your favorite toppings (I suggest onions, jalapeno relish, and ketchup, all topped off with a pickle slice!).


Before I made the original beef and American cheese version of the Juicy Lucy, I also attempted the sandwiched cheese technique with turkey burgers and Monterey Jack (pictured at right). I have to admit, it's tough to choose which I liked better! At the end of the day, I think you just can't go wrong with a hot, juicy burger oozing delicious, melting cheese. Now I have visions of more varieties ... a Greek burger stuffed with feta and topped with tzatziki, an Italian-seasoned burger stuffed with mozzarella and topped with roasted red peppers, a steakhouse burger stuffed with bleu cheese and topped with caramelized onions ... the list goes on and on. But the original is a true American classic that just can't be beat!

Wednesday, August 3, 2011

Presto Pesto: Part II

My last pesto was so mind-blowingly amazing, I thought I'd give it another shot tonight. Like last time, I was working with what I had in the fridge ... and I've determined being forced to use what's on hand is a huge source of inspiration. It's sort of like I'm in the Chopped kitchen and Bill is Ted Allen ... plus all of the judges! Some nights I get chopped and others ... well, I don't walk away with 10 grand, but at least I have a happy husband :)

Today I found in my basket ... I mean refrigerator ... a bunch of Italian flat leaf parsley, a carton of grape tomatoes, and a container of fresh mozzarella. (My ingredients aren't nearly as obscure as the show's, but way easier to work with!) Immediately, I conjured up images of caprese salad, but turned into a pasta.

Now I have to be honest and admit that Bill wasn't the biggest fan of this dish (which means I got chopped tonight). I agree that it wasn't as spectacular as the Cilantro Pesto. But I thought it was still pretty darn good, thanks in part to a (rare) stroke of genius I had. I decided to toss the tomatoes in with the boiling pasta for just a couple minutes to see what happened. And what happened was delicious! They burst ever-so-slightly in the water and released yummy, tomato-y juices. Plus, I loved the texture of the cooked tomatoes and how the hot pasta made the cheese melt just a little bit ... Yum!

Caprese Pesto Pasta
Ingredients:
1/4 cup pine nuts
1 bunch Italian parsley leaves
3 garlic cloves
Pinch red pepper flakes
1/2 cup finely grated Romano cheese
2 teaspoons lemon juice
1/4 cup olive oil
Salt and pepper
1 lb. pasta (of your choice)
1/2 cup grape tomatoes, halved
1/2 cup fresh mozzarella pearls

Directions:
Pulse pine nuts in a food processor until finely ground. Add parsley, garlic, red pepper flakes, and cheese. Blend until smooth. With food processor running, add lemon juice and oilve oil. Blend until well-combined. Season with salt and pepper.

Meanwhile, you should be boiling your pasta. Toss tomatoes into boiling pasta with 2 minutes left. When pasta is cooked, reserve 1 ladle of the cooking liquid, then drain pasta and tomatoes. Toss warm pasta with pesto and mozzarella pearls, adding reserved cooking liquid as necessary (I only added a tablespoon or so). Serve.