Monday, February 27, 2012

More Mexican

My reasons for loving Mexican food go far beyond margaritas. At least one other fantastic reason to love Mexican is because some recipes are so freskin' easy to prepare in a pinch. When it comes to tacos, quesadillas, and as I recently discovered, tostadas, deliciousness is seriously only minutes away.

I don't have a good reason why, but I've never been much of a tostada person. Must be because they're so tricky to eat (as Bill learned, they really do have to be parallel to your plate or you risk losing all of your toppings!). But when I came across this recipe for chicken and mushroom tostadas, I knew I had to give them a whirl. I switched them up a bit (flour vs. corn tortillas, queso fresco vs. manchego cheese, omitting the corn), but these were just as yummy as I'd figured they would be! In fact, I'm super stoked that I picked up this tortilla baking tip - I can think of infinite topping possibilities that will make super quick, super tasty dinner ideas!

Chicken and Mushroom Tostadas
Ingredients:
2 tablespoons olive oil
4 6-inch flour tortillas
4 oz. mushrooms, roughly chopped
1 jalapeno pepper, seeded and minced
2 cloves garlic, minced
1 cup cooked, shredded chicken
Salt and pepper
1/4 cup queso fresco, crumbled
Salt and pepper

Directions:
Preheat oven to 425 degrees. Place a wire rack over a rimmed baking sheet. Brush both sides of tortillas with olive oil, place on rack, and bake until crisp and lightly browned, 5 to 10 minutes.

Heat remaining oil in skillet over medium-high heat. Add mushrooms and jalapenos, season with salt, and cook until softened, about 5 minutes. Add garlic and cook until fragrant, about 30 seconds. Add chicken and cook until heated through, about 2 minutes. Season with salt and pepper to taste.

Top warm tortillas with chicken-mushroom mixture and crumble cheese on top. Return to oven and bake until cheese is melted, about 1 minute.

Sunday, February 26, 2012

Roast Post: Mexican Times Three

If there's one thing I get constant cravings for, it's Mexican food. Ok, so it's mostly for chips and salsa and margaritas, but I love me a good taco or enchilada, too. Luckily, I'm discovering that good Mexican food isn't so hard to pull off at home (especially when you have a husband who makes fab margaritas to go with it!).

These are recipes inspired by a few I found in the "One Big Roast, Three Great Meals" chapters of my America's Test Kitchen Cooking for Two books. I have yet to perfect the carnitas (though I made a very good version here). This version was good, but not as rich and flavorful as other carnitas I've had. However, I think I've nailed the (mock) posole. I've never had an authentic posole to compare it to, but this was one delicious soup! It was thick and spicy and hearty and all-around yummy! Oh, and my mango salsa ... amazing. It's the perfect balance of spicy and sweet and so, so fresh. In fact, I just might go dig into that salsa now ...

Mexican Pulled Pork (Carnitas)
Ingredients:
1 (3 lb.) pork butt
2 cups water
1 small onion, peeled and halved
2 tablespoons lime juice
2 bay leaves
1 teaspoon cumin
1 teaspoon oregano
Salt and pepper
1 orange, halved

Directions:
Adjust oven rack to lower middle position and preheat oven to 300 degrees. Combine pork, water, onion, lime juice, bay leaves, cumin, oregano, 1 teaspoon salt, and 1/2 teaspoon pepper in a large Dutch oven. Juice the orange and add the juice and orange halves to the pot. Bring to a simmer over medium-high heat. Cover, transfer pot to oven, and cook until meat is very tender, about 2 hours.

Remove pot from oven and turn oven to broil. Discard orange halves, onion, and bay leaves. Remove pork to cutting board. Bring braising liquid to a simmer over medium-high heat and cook, stirring often, until liquid is syrupy and reduced to about 1 cup, about 8 to 12 minutes.

Using 2 forks, pull pork apart. Gently toss with reduced braising liquid and season with salt and pepper. Spread pork in an even layer on a wire rack set over a rimmed baking sheet.

Place baking sheet on lower-middle oven rack and broil until top of meat is well-browned and edges are slightly crisp, about 10 minutes, flipping once. Serve with warm tortillas and desired garnishes (I chose the onion-cilantro-lime mixture I wrote about here). Reserve about 2/3 of meat for other recipes.

Spicy Mexican Pork Stew (Posole)
Ingredients:
1 tablespoon vegetable oil
1 shallot, minced
2 garlic cloves, minced
2 teaspoons chili powder
1 1/2 teaspoons chipotle chile in adobo, minced
1/8 teaspoon oregano
1 tablespoon flour
2 cups chicken broth
3/4 cup canned hominy, drained and rinsed
1/2 red bell pepper, chopped
1 1/2 cups cooked pork
2 tablespoons cilantro, chopped
Salt and pepper

Directions:
Heat oil in medium saucepan over medium heat. Stir in shallot and cook until softened, 2 to 3 minutes. Stir in garlic, chili powder, chipotles, and oregano and cook until fragrant, about 30 seconds. Stir in flour and cook 1 minute.

Stir in chicken broth and bring to simmer over medium-high heat. Stir in hominy and bell pepper, reduce heat to medium-low, and simmer until bell pepper is just tender, 5 to 10 minutes.

Stir in pork and continue to cook until heated through, about 2 minutes. Off heat, stir in cilantro and season with salt and pepper. Grab a spoon!

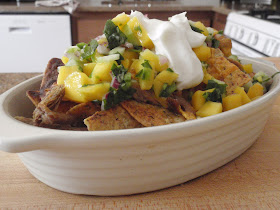
Pulled Pork Nachos with Mango Salsa (um ... Nachos)
Ingredients:
For Salsa
1 mango, peeled and chopped
1/2 cucumber, peeled, seeded, and finely chopped
1/3 cup red onion, finely chopped
1/2 jalapeno, seeded and finely chopped
2 to 3 tablespoons cilantro, chopped
1 1/2 tablespoons fresh lime juice
Salt (to taste)

For Nachos
24 multigrain tortilla chips
1/2 cup cooked, pulled pork
1/3 cup sharp cheddar cheese, shredded
Sour cream, for topping

Directions:
To make salsa, toss all ingredients together in a bowl. Set aside.

To make nachos, heat broiler. Layer half of chips in a small casserole dish. Layer half of pork and half of cheese over chips. Top with remaining chips, then pork, then cheese. Broil until cheese is melted and pork is heated through, about 5 minutes. Remove from oven and top with 1/2 cup salsa and a dollop of sour cream. Dig in!

If you like these recipes, you may also like ...
Quick Chicken and Cheese Tamales
Chicken Tortilla Soup
Enchilada Suizas Stacked Casserole

Saturday, February 25, 2012

Doughnut. Dusted. Delicious.

You know that I'm crazy about cinnamon. And I'm even crazier about cinnamon sugar. So crazy, in fact, that I'd make a meal of cinnamon sugar toast in college when there wasn't anything appetizing in the dining hall (which was often).

Perhaps the only thing more perfect than cinnamon sugar toast is a cinnamon sugar dusted doughnut. Better yet if it's warm ... I'm getting weak in the knees just thinking about it! Trouble is, doughnuts aren't good for you. But muffins (in appropriate portion sizes) aren't so bad, right? That's why I got so excited when I came across this recipe for cinnamon sugar muffins that just so happen to taste just like cinnamon sugar doughnuts.

This recipe is headed into regular rotation, especially since it cuts the hassle of hauling out the toaster, and the guilt of gulping down a doughnut. These muffins are cake-y, dense, and delicious. If you take a bite when they're still warm, you'll know what heaven tastes like. Trust me. They'll be your new favorite!

Cinnamon Sugar Dusted Doughnut Muffins
Ingredients:
For Muffins
1 3/4 cup flour
1 1/2 teaspoons baking powder
1/2 teaspoon salt
1/2 teaspoon nutmeg
1/2 teaspoon cinnamon
1/3 cup oil
3/4 cup sugar
1 egg
3/4 cup milk

For Cinnamon Sugar Coating
1/4 cup butter, melted
1/3 cup sugar
1 tablespoon cinnamon

Directions:
Preheat oven to 350 degrees. Spray a muffin tin liberally with non-stick cooking spray.

In a bowl, whisk together flour, baking powder, salt, nutmeg, and cinnamon. In a separate bowl, combine oil, sugar, egg, and milk. Add dry ingredients to wet ingredients, stirring enough just to incorporate.

Distribute batter evenly among cups of muffin tin. Bake 15 to 20 minutes, or until toothpick inserted in center of muffin comes out with just a few crumbs attached. Allow muffins to cool in pan 5 minutes, then, using a butter knife, loosen edges of muffins from pan and remove to a wire rack.

For coating, melt butter in a bowl. In another bowl, combine cinnamon and sugar. Dip slightly warm muffins first in butter, rolling to coat, and then in cinnamon sugar (rolling to coat again). Return to wire rack to cool (or not ... it's incredibly hard not to eat them at this stage!).

Sunday, February 19, 2012

Better with Cheddar

I know I told you yesterday that I was making an effort to seek out more healthy recipes ... but that doesn't mean I'm not going to splurge once in a while. The way I see it, any meal cooked at home is going to be healthier than a meal out. So there's no reason why I can't occasionally cook something creamy and rich and sort of decadent ... like some amazing cheddar chive polenta!

I happened across this recipe for Italian sausages and sauteed apples in one of my Food & Wine cookbooks (I swear, I want to cook this book from cover to cover, there's so much good stuff in it!). The authors suggested serving these sausages with cheesy grits, but I didn't bother flipping to that recipe. I have a go-to polenta recipe from (where else?) America's Test Kitchen, so I broke that out. I'd never made the polenta with cheddar, nor had ATK told me I could, but I figured it couldn't hurt. But it did hurt ... it hurt so GOOD!

I don't know where this cheesy, gooey, delicious cheddar chive polenta has been all my life, but I know where it's going. In my belly. Much more often. Was it better than ATK's original parmesan polenta? Heck yes! This was another dish Bill and I couldn't stop eating straight from the pan. It's dangerous, but hey, I'm a risk taker.

(Oh, and the sausages and apples were delish, too. I'm sure the polenta regrets overshadowing them.)

Italian Sausages with Sauteed Apples and Cheddar Chive Polenta
Ingredients:
1 tablespoon olive oil
2 sweet Italian sausages (I used chicken, my fav from Sendik's)
1/2 cup water
1 Granny Smith apple, peeled and sliced thin
1/2 teaspoon fennel seeds
1/2 tablespoon cider vinegar
Salt and pepper
Cheddar Chive Polenta (recipe follows)

Directions:
Heat oil in large skillet over medium-high heat. Brown sausages on all sides, about 5 minutes. Add water to skillet, cover, and cook until sausages are done and water is mostly evaporated, about 7 to 8 minutes.

Add apples and fennel seeds to skillet and cook, stirring occasionally, until apples are tender and browned, about 8 minutes. Stir in vinegar and season with salt and pepper to taste. Serve atop cheddar chive polenta.

Cheddar Chive Polenta
Ingredients:
1 1/4 cups water
Pinch salt
Pinch baking soda
1/3 cup polenta
1/2 tablespoon butter
1/2 cup cheddar, shredded (I used a delish beer cheddar)
1/2 tablespoon fresh chives, snipped
Salt and pepper

Directions:
In a medium saucepan, bring water to a boil over medium-high heat. Stir in salt and baking soda (the baking soda helps make this recipe quick, so don't skip it!). Slowly whisk in polenta. Bring to a boil, stirring occasionally, about 1 minute. Reduce heat to low and cover.

After 5 minutes, whisk polenta to break up any clumps. Cover and cook, without stirring, about 10 to 15 minutes longer. Polenta will be loose, but will thicken as it stands.

Off heat, stir in butter until melted. Gently stir in cheese until melted. Stir in chives. Season with salt and pepper. Dig in!

Saturday, February 18, 2012

Light is Right

If you're not already obsessed with Pinterest, I'm sure it's only a matter of time. I resisted for a while, but gave in when my BFF started telling me about all of the fabulous recipes she was finding. Since then, I've wasted spent approximately 10,000 hours browsing boards, pinning, and repinning recipes like mad. It's fantastic.

The problem is, Pinterest must be populated primarily with fatties. Because every delicious recipe I find is so terribly bad for you. Homemade Twinkies? Homemade Peanut Butter Cups? Homemade Twix? Yes, please! But in moderation.

I felt like I was packing on the pounds just reading this recipes, and I haven't even worked up the courage to make any of them yet. So I'm determined now not to pin every fattening dish I feast my eyes on ... instead, I'm making a concerted effort to build a collection of lighter recipes, like this honey lime chicken that a fellow blogger adapted from Sunset magazine (based in the Bay - yay!). I thought a nice tossed salad with honey lime vinaigrette would make a perfect, light accompaniment. I adapted the vinaigrette recipe from one I found on Good Housekeeping's website and it's a keeper. Just the right balance of sweet and tangy and a cinch to make in a pinch!

Honey Lime Grilled Chicken
Ingredients:
3 tablespoons olive oil
Juice of 1 lime
1 tablespoon honey
1 teaspoon cayenne pepper
Salt and pepper
2 boneless, skinless chicken breasts

Directions:
Combine first 5 ingredients in a large zip-top bag. Add chicken breasts and turn to coat. Refrigerate overnight.

Preheat grill pan over medium-high heat. Spray pan with non-stick cooking spray. Gently lay chicken breasts in pan. Grill 7 to 8 minutes per side or until a thermometer registers 165 degrees, adjusting heat as necessary to prevent chicken from charring.

Serve chicken alongside mixed greens with honey lime vinaigrette (recipe follows).

Honey Lime Vinaigrette
Ingredients:
1/3 cup fresh lime juice
1 tablespoon honey
1 tablespoon rice wine vinegar
Salt and pepper

Directions:
In a small bowl, whisk lime juice, honey, and vinegar. Season with salt and pepper to taste.

Wednesday, February 15, 2012

Second Shot at Soup

True story: I was all geared up to write a post about Bill's favorite chicken tortilla soup (which I made last week) and then I realized I'd written that post before. A year ago. No wonder Bill had been begging me to make a batch!

Good thing I have a backlog of dishes I haven't written about yet. And the next one on my list wasn't a far cry from what I'd originally planned to write about. This sopa seca (or dry soup) jumped out at me from my Food Network Favorites cookbook. I loved that it's a cross between a soup and a casserole and sort of blurs the line between Italian and Mexican. I was also intrigued because it sounded like a version of spaghetti pie, which Tiff just recently introduced me to when she brought it to our Super Bowl party a couple weeks ago. And Tiff, your spaghetti pie was very good, but you have GOT to try this recipe!

I made some modifications from the original, most notably in substituting regular vermicelli for the fideos (or vermicelli bundles). You try finding fideos in a Midwestern grocery store. It's impossible. And don't even think about asking one of the high school boys in the aisle. I'm quite sure he'd have no idea. My substitution was just fine (at least as far as I can tell, but I've never had another sopa seca to make a fair comparison). If you have, please weigh in!

Sopa Seca (Dry Soup)
Ingredients:
1 tablespoon olive oil
12 oz. vermicelli, broken
1 medium onion, chopped
3 cloves garlic, minced
1 teaspoon oregano
1 teaspoon chili powder
1 bay leaf
1 1/2 cups canned whole tomatoes, crushed
1 to 2 chipotle chilis in adobo, minced
1 1/2 cups chicken broth
Salt and pepper
2 cups shredded cooked chicken
1 cup shredded cheddar cheese

Directions:
Preheat oven to 375 degrees.

Heat oil in a skillet over medium-heat heat. Add onion and cook, stirring occasionally, until golden brown, about 8 minutes. Stir in the garlic, oregano, chili powder, and bay leaf, and cook until fragrant, about 30 seconds. Add tomatoes along with their juices. Add chipotles, increase heat to high, and cook until thickened, about 2 minutes. Stir in broth, vermicelli, salt, and pepper. Bring mixture to a boil, reduce heat, and simmer gently, uncovered, about 5 minutes. Stir in chicken.

Remove bay leaf. Transfer mixture to baking dish, sprinkle with cheese, and cover loosely with foil. Bake until cheese melts, about 20 minutes. Let stand several minutes before serving.

Monday, February 13, 2012

Sweet Heart Bites

Valentine's Day calls for a sweet treat and this year I thought I'd do something a little bit fancy. I looked at dozens of recipes over the weekend and finally decided that these cutout cookies were too pretty not to make. Little did I know, however, that I was digging deep into Milwaukee's roots when I chose them!

This recipe is adapted from one found on the Taste of Home website. I got multiple questions today about what a "linzer" cookie is, to which I replied, "I have no idea. It's just what the recipe was called." That seemed to satisfy everyone else's curiosity, but not mine. Of course I had to google (or more accurately, bing) it tonight to get a real answer. Naturally, I came across a credible answer from Wikipedia.

I suspected these cookies bore some relation to Linzer Torte, an Austrian specialty named for the city of Linz. It typically has a crumbly pastry crust with a layer of fruit preserves and a lattice top. Similarly, these cookies have a butter-y, nutty crumb texture with sweet jam in the middle. (As a side note, I used Smucker's Simply Fruit, which is absolute perfection. It tastes like fruit instead of sugar! Oh, and the seedless variety is an absolute must. The cutouts will bear a resemblance to stained glass absent the icky seeds.)

Where does Milwaukee come in, you ask? As I continued my research, I discovered that this dessert became popular in the U.S. in the 1850s when an Austrian traveler brought the Linzer Torte to Milwaukee. That's right, people. I made a local specialty without even knowing it! How's that for a little Midwestern love?

Raspberry Jam-Filled Linzer Heart Cookies
Ingredients:
1 1/4 cups butter, softened
1 cup sugar
2 eggs
3 cups flour
1 tablespoon cocoa powder
1/2 teaspoon salt
1/4 teaspoon cinnamon
1/4 teaspoon nutmeg
1/8 teaspoon ground cloves
2 cups almond flour
Seedless raspberry jam
Confectioners' sugar (which would have made them even prettier, but I forgot I was out after making this delicious fudge frosting a few weeks ago)

Directions:
In a large bowl, cream butter and sugar until fluffy. Add eggs, one at a time, beating well after each addition. In another large bowl, combine flour, cocoa, salt, cinnamon, nutmeg and cloves. Gradually add to the creamed mixture and mix well. Stir in almond flour. Refrigerate 1 hour or until dough is easy to handle.

Preheat oven to 350 degrees. On a lightly floured surface, roll out dough to 1/8-inch thickness. Cut with 3-inch heart-shaped cookie cutter. From the center of half the cookies, cut out 1-1/2-inch hearts.

Place cut cookies on ungreased baking sheets. Bake10-12 minutes or until edges are golden brown. Remove to wire racks to cool.

Spread 1/2 teaspoon jam over bottom of solid cookies. (Here's where you'd sprinkle cutout cookies with confectioners' sugar, if you had it.) Carefully place cutouts over jam.

Oh, and don't forget the best part of making these cute little cutouts ... you'll end up with 36 adorable, scrumptious little hearts to bake! And popping a handful of those will make you feel so much less guilty than eating a few cookies ...

Saturday, February 11, 2012

Awesome Sauce

Over the years, I've made dozens of variations of pasta sauce. Some have certainly been better than others, but I can't say that I've ever disliked any of them. The beauty of pasta sauce is that the possibilities are infinite and that no two batches are ever going to turn out exactly the same.

On occasion, I like to switch it up and make more than a basic tomato sauce. Roasted red pepper sauce is always a favorite, but I've never made a version quite like this! I'm undecided if it was the addition of the chopped sun-dried tomatoes, the splash of balsamic, or the handful of fresh basil that made this sauce ... but whatever it was, it was delicious! Your evidence: Bill stood over the stove eating this sauce out of the pan with a spoon. A spoon! He didn't even want to use bread as a utensil ... which just goes to show how good this sauce is all on its own.

Pasta with Tomato and Roasted Red Pepper Sauce
Ingredients:
1, 28-oz. can plum tomatoes
2 tablespoons olive oil
3 cloves garlic, smashed and chopped
1/3 cup oil-packed sun-dried tomatoes, drained and chopped
1/2 cup roasted red peppers, drained and chopped
1/4 teaspoon crushed red pepper flakes
1 teaspoon sugar (I added more ... probably closer to 2 or 2 1/2 teaspoons)
Salt and pepper
1/2 cup fresh basil leaves, chopped
1 tablespoon balsamic vinegar
12 oz. cooked pasta of your choice

Directions:
Pour canned tomatoes and their juices into a large bowl and crush them with your hands.

Heat olive oil in a large skillet over medium heat. Stir in garlic, sun-dried tomatoes, roasted red peppers, and red pepper flakes. Cook until garlic is fragrant, about 1 minute. Add tomatoes, sugar, salt, and pepper. Bring to a boil over high heat, then reduce to a simmer. Cook, uncovered, until thickened, about 10 minutes. Remove sauce from heat, stir in vinegar and basil, cover, and set aside for 10 minutes to allow flavors to come together.

Toss with cooked pasta (and possibly a little reserved cooking liquid) and serve.

Sunday, February 5, 2012

Not Your Average Clucker

One of my dad's favorite things to say to me when I told him I was making chicken for dinner was, "You're going to turn into a chicken." He had a lot of opportunities to tell me that because I feel like we're eating chicken all the time. What he probably didn't realize, though, was that I rarely make the same chicken dish twice and these dinners were so much more than just chicken.

I'm sure a lot of people get into the habit of breaking out the same tried-and-true recipe week after week. I prefer to switch it up, so I'm always scouring cookbooks and blogs for new dinner ideas, and sometimes I'm pushing Bill's limits with dishes he wouldn't ordinarily eat. It seems that's working out well because he opened up a Food & Wine cookbook the other day and pointed out this recipe. Apricots aren't Bill's thing (but they're totally mine!), so I was a bit surprised. I happily prepared this chicken dish for him because it was a nice break from the norm.

Turns out Bill is still not really a fan of apricots, but he doesn't mind a hint of apricot flavoring. The sauce is sweet but citrus-y, and I imagine if I had let it thicken a little bit longer it would have made an even more delicious glaze (mmm ... that glaze would be good on chicken wings!).

I hope my dad's watching me cook now and he sees that dinner is more than just chicken. He'd probably still tell me I'm going to turn into one, but at least I'd be more than your average clucker.

Chicken with Apricot-Onion Pan Sauce
Ingredients:
1 1/2 oz. dried apricots
2 boneless, skinless chicken breasts
Salt and pepper
1/2 tablespoon olive oil
1 small onion, diced
1 garlic clove, thinly sliced
2 thyme sprigs
1 bay leaf
1/4 cup dry white wine
3/4 cup chicken stock
1 tablespoon apricot preserves
1/2 tablespoon butter

Directions:
Preheat oven to 350 degrees. In a bowl, cover apricots with hot water and let stand until soft, about 15 minutes; drain.

Dry chicken with paper towels and season with salt and pepper. Heat oil in a skillet over medium-high heat. Add chicken and cook until golden brown, 5 minutes. Flip and cook 3 minutes more. Transfer chicken to a baking sheet lined with a metal rack and roast 14 minutes.

Add onion, garlic, thyme, and bay leaf to skillet. Season with salt and cook over medium-high heat until onion is tender. Add wine and reduce by half, scraping up browned bits in skillet. Add chicken stock, apricots, and apricot preserves and bring to a boil. Cook over high heat until sauce thickens. Off heat, swirl in butter until melted. Discard thyme sprigs and bay leaf. Season sauce with salt and pepper. Transfer chicken to plates, spoon sauce on top, and serve.