Wednesday, December 28, 2011

A Very Italian Christmas

Every so often, my mom digs up a gem of a recipe from my grandmother. More often than not, those recipes conjure up vivid memories of my childhood, but sometimes they only spark a vague recollection ... that is, until I taste them. That was the case with these cookies, which my mom brought up out of nowhere a few months ago and I finally made on Christmas Eve.

The timing was appropriate, as they're sometimes called Italian Christmas Cookies. I've also heard them referred to as Italian Fig Cookies, Sicilian Dried Fruit and Nut Cookies, and I've even seen versions called Fruit and Walnut Pillows. But these delectable little treats are authentically known as cuccidati. I couldn't find the origin of the word, and not being a speaker of Italian I can barely pronounce it. So let's just go with this ... they're basically Italian Fig Newtons, frosted. And they're amazing.

I don't know why I didn't remember these cookies, because according to my mom, my grandma made them often. I turned to The Google to jog my memory (which was quite a feat - I had no idea how to spell cuccidati and my mom was pronouncing it like the Italian she is). When I finally figured it out and stumbled across a photo, it started coming back to me. Those multi-colored sprinkles are immediately recognizable and should be unforgettable. But it wasn't until I finally bit into one that I remembered them from Christmas' past.

There really is no better way to describe them than as frosted Fig Newtons. There are some slight differences ... where the Fig Newton's filling is very sweet, this is a bit tart, and where the Fig Newton's cookie is super soft, this crust is a bit flaky. But now that I've made these, even given how time-consuming they are, I'll never go back to the packaged variety.

Cuccidati (Italian Fig Cookies)
Ingredients:
For the Filling
1 cup dried figs
1/2 cup dried apricots
1/2 cup raisins
1/2 cup orange juice
1/3 cup slivered almonds
1/3 cup walnut halves
1/4 cup corn syrup
Zest of 1 lemon

For the Dough
1/3 cup sugar
1/2 cup butter, softened
1 egg
1/4 teaspoon vanilla
1/3 cup milk
1/2 teaspoon salt
1 1/2 teaspoons baking powder
2 1/4 cups plus 2 tablespoons flour

For the Icing
1 1/2 cups confectioners' sugar
1 1/2 tablespoons lemon juice
Multi-colored sprinkles

Directions:
Make filling by pulsing all filling ingredients in a food processor until nearly smooth, about 2 minutes. Remove filling to a small bowl and set aside. Clean food processor bowl.

Make dough by mixing butter and sugar in food processor until smooth. Add egg, vanilla, and milk. Add salt, baking powder, and flour and pulse until dough comes together in a ball. Dough will be soft.

Preheat oven to 350 degrees.

Roll dough between two pieces of parchment paper. Freeze until dough is firm enough to handle, about 10 minutes.

Roll dough to about 1/8-inch thickness. Cut into 2x3-inch squares. Place a scant tablespoon of filling in center of each square and fold the right edge, then left edge over filling (like you're folding a letter). Transfer to ungreased baking sheets, setting slightly apart.

Bake until cookies are lightly browned, about 25 minutes, rotating pans halfway through baking time. Transfer to wire racks to cool.

Make icing by stirring confectioners' sugar with lemon juice, adding a bit of water to adjust consistency if necessary (it should be a bit more paste-like than glaze-like, but not as thick as a frosting). When cookies are cooled completely, spoon icing over each and decorate with multi-colored sprinkles (and yes, they must be multi-colored otherwise they're not authentic cuccidati).

Tuesday, December 6, 2011

Can't Stop Christmas Cookies

In my house, baking is a year-round activity, certainly not reserved for Christmastime. But there are a couple tools in my kitchen that aren't broken out quite as often in other months as they are in December ... the rolling pin and cookie cutters!

It's not that cut-out cookies can't or shouldn't be made outside of Christmas. In fact, one of the best gifts my BFF ever gave me was a shoebox filled with a dozen cookies cutters, one themed around each month of the year. But those dozen assorted cutters are trumped by the nearly two dozen Christmas cutters I've collected, which definitely make cut-out cookies more tempting at this time of year.

Surprisingly enough, cut-out cookies aren't part of my typical holiday repertoire and don't show up in my treat tins consistently. There are simply too many other items on the list. But when I stumbled across this recipe, I decided it was about time to put the cookie cutters back in rotation.

Not only were these cookies so pretty, but they were also so tasty :) The filling needed a bit more peppermint (two drops just weren't peppermint-y enough for me), but the cookies were buttery, flaky, and rich. I guarantee you won't be able to stop eating them!

Oh, and also worthy of note, I've finally found a recipe that stands up perfectly to baking - they didn't spread in the oven at all, which is a problem I've had with similar doughs in the past. I'm not sure if the trick was the temperature of the butter, the stiffness of the cream cheese, or the length of time the dough spent in the fridge, but whatever it was, it worked!

Butter Cookies with Peppermint Filling
Ingredients:
For Cookies
1/2 cup butter, softened
2 ounces cream cheese, softened
3 tablespoons sugar
1 1/4 cup flour
Red decorators' sugar

For Filling
2/3 cup confectioners' sugar
2 tablespoons butter, softened
1 or 2 drops peppermint extract
1 or 2 drops green food coloring

Directions:
Preheat oven to 375 degrees.

To make cookies, cream butter, cream cheese, and sugar using a handheld mixer in a medium bowl until smooth. Add flour slowly, mixing on low, until incorporated. Scoop dough into a ball, flatten into a disk, wrap in plastic and refrigerate until dough has firmed slightly, about 30 minutes.

On a floured surface, roll dough about 1/8-inch thick. Cut out as many shapes (I used snowflakes and stars) as possible with a small cookie cutter and transfer to ungreased baking sheets, leaving about 1 inch between each cookie. Re-roll dough scraps and repeat until all dough is used. Sprinkle cookies with sugar, pressing very lightly to adhere.

Bake until cookies are golden around edges, 10 to 12 minutes. Cool 5 minutes on baking sheets and then transfer to wire racks to cool completely.

To make filling, place sugar, butter, peppermint extract, food coloring and 1/2 teaspoon water in a medium bowl and beat on medium speed until well combined and fluffy. Spread a thin layer of filling on half of cookies and place remaining cookies on top to make sandwiches.

Monday, December 5, 2011

Apple Pie, Two Ways

In my two week absence, I am sad to report that I didn't do much cooking. My trip to San Francisco was a whirlwind and didn't involve as many homecooked meals as I would have liked, and in the time since I've returned I didn't really get back into the kitchen until this weekend.

Luckily, the short time I have spent in the kitchen lately yielded a couple of outraegeously delicious desserts! My number one contribution to Thanksgiving dinner at my parents' house was a beautiful, tender and tart apple pie. And since Bill was craving an apple treat post-Thanksgiving, I put a new twist on apple pie with some super yummy apple pie bars this weekend.

My apple pie was inspired by (but not quite copied from) Wolfgang Puck's Christmas Apple Pie. And when I say "inspired by," I mean that I used his crust and winged the rest. Fortunately, that crust went over really well. Also fortunately, my improvised filling went over just as well! In fact, my dad called it "stupendous." And thus, I've coined this recipe "Jen's Thanksgiving Apple Pie."

As delish (and pretty!) as my apple pie was, I have to admit that my after Thanksgiving apple pie bars were even better. I have a serious thing for crumble toppings, so as much as I enjoyed Wolfgang's shortbread-like crust, I have to give it to the oat-y, sugar-y, cinnamon-y crumbs that topped these bars (plus, the caramelized apple filling takes it to a whole other level of deliciousness!). I highly recommend that both of these apple desserts make an appearance on your holiday, table ... but if you have to pick just one, go for the bars!

Thanksgiving Apple Pie
Ingredients:
For the Crust
2 1/3 cups flour
1/3 cup sugar
1 cup (2 sticks) butter, chilled, cut into small pieces
2 egg yolks
1 or 2 tablespoons milk

For the Filling
6 to 8 (depending on their size) Granny Smith apples
1/2 cup plus 1 tablespoon sugar
2 teaspoons cinnamon
1/2 teaspoon nutmeg
1 tablespoon lemon juice
1 egg white, lightly whisked

Directions:
In food processor fitted with steel blade, combine flour and sugar. Add butter and process until texture resembles fine meal.

In a small bowl, whisk together yolks and 1 tablespoon milk. Scrape into machine and process until a ball begins to form, using additional tablespoon milk, if necessary. Remove dough from machine, and on a lightly floured surface, press into a circle. Wrap in plastic wrap and refrigerate at least 1 hour.

Divide pastry into 2 parts, one a little larger than the other. On a lightly floured surface, roll smaller piece into a round, 1/8 to 1/4-inch thick. Arrange in pie plate, leaving a 1/2-inch overhang. (Reserve trimmings.) Tuck overhang under, making a slightly thicker edge. Chill 30 minutes.

Preheat oven to 400 degrees.

Peel, core, and slice apples. Place apples in a large bowl, sprinkle with 1/2 cup sugar, cinnamon, and nutmeg. Stir in lemon juice. Spoon filling into the prepared, chilled crust. 

On a lightly floured surface, roll out reserved dough, about 1/4-inch thick. Carefully place dough over filling and trim edges (again, reserve trimmings, adding to scraps reserved from bottom crust). Press edges together to seal pie (this doesn't haven't to look professional, but to make pretty, fluted edges, see America's Test Kitchen's tips here). Roll out trimmings and use a sharp knife or small cookie cutter to cut decorative leaves. Adhere leaves to top crust (in any pattern you like!) using a little beaten egg white. Cut 4 slits into top of pie to allow steam to escape while cooking.

Brush top crust with remaining egg white and sprinkle with remaining sugar. Bake 30 minutes, turn the oven down to 350 degrees and bake 35 to 40 minutes longer, until crust is golden brown. Cool on wire rack.

Apple Pie Bars
Ingredients:
For the Crust
3/4 cups butter ( 1 1/2 sticks)
1/2 cup sugar
1 1/2 cups flour
1/4 teaspoon salt

For the Filling
3 tablespoons butter
1/4 cup brown sugar
6 Honeycrisp apples (or any variety you like), peeled, cored, and sliced
1/2 tablespoon cinnamon
1/4 teaspoon nutmeg

For the Topping
1 cup quick-cooking oats
1/4 cup flour
3/4 cup brown sugar
1/2 teaspoon cinnamon
1/4 teaspoon baking soda
1/4 teaspoon salt
4 tablespoons (1/2 stick) butter

Directions:
Preheat oven to 375 degrees.

To make crust, beat butter and sugar until light and fluffy. Beat in flour and salt until a soft dough forms. Turn dough out into a parchment-lined 9x13-inch baking dish. Press dough over bottom and up edges of dish in an even layer. Bake 20 minutes or until golden and set. Set aside.

To make filling, melt butter and brown sugar in large skillet. Add apples and cook over high heat, stirring occasionally, about 10 minutes. Stir in cinnamon and nutmeg. Continue cooking until apples are caramelized and very tender and liquid has evaporated, about 10 minutes longer. (Add a few tablespoons water to pan to prevent scorching, if necessary.) Remove from heat and let cool.

To make topping, mix oats, flour, brown sugar, cinnamon, baking soda, and salt in a small bowl. Using a pastry cutter, cut in butter until mixture resembles coarse meal. Press mixture into clumps.

Spread apple filling over crust. Scatter crumbs on top. Bake 1 hour, or until topping is golden, rotating dish halfway through cooking time. Cool completely (or mostly) on a wire rack before cutting into 2-inch bars.

Monday, November 21, 2011

Tagine Machine: Part II

With just a few days until I head to San Francisco for Thanksgiving (the most wonderful day of the year!), I should be posting about a Turkey Day treat. But I've been meaning to write about the recipe that inspired my tagine tangent, the Moroccan meatball kefta tagine that I saw on Rachael's show a few weeks ago.

I'm always skeptical of Rachael's recipes, but I occasionally stumble upon one that becomes a favorite (like this awesome steakhouse chili). And I'm on a major poached egg kick right now, so anything with yummy, runny egg yolks sounds delicious to me. So with some minor trepidation, I moved forward with this Moroccan marvel.

And I'm glad I did! I wouldn't rank it right up there with the chili, but this was super delicious. I, of course, made a number of substitutions, including replacing Rachael's beef with turkey, omiting chickpeas at Bill's request, and shaking up my own spice blend. I especially liked the little bit smokey, little bit spicey kick from the blend I concocted (note that I didn't provide actual measurements because I truly did just dump enough for a single serving into a bowl and shake to combine ... you can find the recipe for Rachael's original large batch here). The eggs really did add a richness that would have been otherwise absent from the sauce, and I could have gobbled up all of those turkey meatballs straight from the oven. (Consider that my tribute to Thanksgiving this week!)

Moroccan Meatballs with Eggs
Ingredients:
For Spice Blend
Pinch cumin
Pinch paprika
Pinch nutmegPinch cinnamon
Pinch cardamom
Pinch allspice
Pinch cayenne pepper
Pinch ground cloves

For the Kefta
3/4 lb. ground turkey
1/3 cup plain bread crumbs
3 eggs (1 for meatballs, 2 for poaching)
1 onion, finely chopped
4 cloves garlic, minced
Pinch cinnamon
Pinch nutmeg
Salt and pepper
Olive oil
2 small zucchini, chopped
2 (14 oz.) cans diced tomatoes
1 (8 oz.) can tomato sauce
1 tablespoon honey
1 tablespoon spice blend

Directions:
To make the spice blend, combine spices in a small bowl. Set aside.

Preheat oven to 350 degrees. Arrange a wire rack over a baking sheet.

In a large bowl, combine turkey, bread crumbs, 1 egg, 2 tablespoons onion, 2 cloves minced garlic, cinnamon, nutmeg, salt, pepper, and 1 tablespoon olive oil. Roll turkey mixture into small balls and arrange on wire rack. Bake until cooked through, 20 to 25 minutes.

Meanwhile, heat 1 tablespoon olive oil in a Dutch oven over medium-high heat. Add remaining onion and garlic, and zucchini. Cook 7 to 8 minutes, then add the diced tomatoes, tomato sauce, honey, and spice blend. Bring to a simmer. Remove meatballs from oven and place in sauce.

Make 2 wells in the sauce and drop in eggs (I found it helpful to crack each egg into a ramekin, then slide them into the sauce). Cover pot and simmer to poach, about 4 to 5 minutes. Serve over rice.

Saturday, November 19, 2011

Not-a-Picnic Potato Salad

We just made a very exciting appliance purchase ... a new range (with 5 gas burners AND a double oven ... it's going to be fantastic!). Unfortunately, it won't be delivered until Wednesday, which means I won't be able to use it until I come back from my trip to San Francisco. Problem is, I'm now so disenchanted with what's currently in my kitchen that I'm having trouble mustering up the motivation to cook anything at all.

That's when America's Test Kitchen comes to the rescue with insanely quick and easy, yet intensely delicious recipes! I discovered this gem on The Feed a couple weeks ago and was excited to try it. It's a perfect weeknight meal, and it takes the concept of potato salad to a whole new (and very sophisticated!) level. Rather than smothering the potatoes with a super thick dressing, here we're lightly tossing them with a yummy vinaigrette. And yes, this is the dish that tricked Bill, my condiment-hating husband, into liking mayonnaise :)

Grilled Chicken with Warm Potato Salad and Lemon-Thyme Vinaigrette
Ingredients:
1/4 cup olive oil
2 garlic cloves, minced
1/2 tablespoon fresh thyme, minced
1/4 cup lemon juice (from 2 lemons)
Salt and pepper
1 1/2 tablespoons mayonnaise
1 lb. fingerling potatoes, halved lengthwise
2 boneless, skinless chicken breasts, pounded to 1/4-inch thickness
2 cups baby spinach

Directions:
Combine oil and garlic in bowl. Whisk in thyme and lemon juice and season with salt and pepper. Transfer 2 tablespoons dressing to large bowl and whisk in mayonnaise.

Place potatoes in large saucepan with cold water to cover by 1 inch. Bring to boil, add 1 teaspoon salt, reduce heat to medium-low, and simmer until potatoes are tender, about 8 minutes. Drain potatoes and toss in large bowl with reserved mayonnaise mixture. Season with salt and pepper.

Season chicken with salt and pepper and toss in bowl with remaining dressing. Grill chicken until lightly charred and chicken registers 160 degrees, 2 to 3 minutes per side. Toss potatoes with arugula and serve with chicken.

Monday, November 14, 2011

Lotsa Focaccia

It becomes more and more obvious to me every day that my love of food is deep-rooted and stems from the dozens of delicious memories from my childhood. As most yummy memories do, mine revolve around my Italian grandmother. But funny enough, it's not always the things she made that I recall so fondly, but sometimes the treats she picked up at the corner bakery.

There are two things that almost always showed up with my grandmother on her visits to our house: chocolate-frosted prune muffins (trust me, they were amazing) and what we affectionately referred to as "pizza bread." As the name suggests, this bread was delicious ... a fluffy, tender center with a just-a-little-bit-crisp crust, topped with either a very, very thin layer of tomato sauce or with olive oil and herbs.

It wasn't until I was in college that I learned that our "pizza bread" was focaccia ... and that it wasn't the same anywhere as it was at my grandmother's favorite bakery. When I left home and that San Francisco bakery was hundreds of miles away, I tried dozens that didn't even come close to being as good. And after my granmother passed and that bakery was too far out of the way for anyone else to bother stopping by, I figured I'd never have my beloved "pizza bread" again.

My focaccia rising alongside my resting pasta dough for homemade ravioli!
And then I moved to Milwaukee and sat down at an unsuspecting trattoria downtown one evening. As often happens at Italian restaurants, a basket of bread was dropped on our table. I took one look - and one whif - and knew I'd found it. This was the "pizza bread." This was the focaccia I thought I'd never find again. But surely it couldn't be as good. The focaccia my grandmother brought us was chewy and moist. This was probably tough and dry. But there was a tomato paste on top. And another with onions and rosemary. It looked right, so it was worth a taste. And it was perfect. It was just like I remembered it. And it's the sole reason that Louise's is my favorite Italian restaurant in Milwaukee to this day.

Shockingly, I hadn't thought of baking my own focaccia, even when I thought I'd tasted my last slice. So the proverbial lightbulb went off when I saw this recipe on America's Test Kicthen Feed the other day. Beware ... this focaccia will take all day (actually, two days!) to make. And most of your time will be spent waiting ... and waiting ... and waiting. But it's worth it.

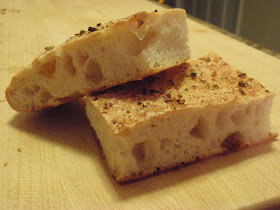
While it's not a perfect replication of what Louise's makes or what I remember my grandmother buying, it seems to be a good substitute in a pinch. It bakes up a bit thicker and fluffier, and it's not quite as moist as I'd like, but it's delicious nonetheless. Just look at those air pockets that give away the chewy, airy interior! Irresistable!

I made a few minor tweaks to my focaccia by switching up the seasoning and baking it on a sheet pan instead of using round cake pans. You can read the Test Kitchen's original recipe here. Oh, and watch the salt. I had a heavy hand in the step just before baking and added a pinch (or palmful) too much. Oops!

Focaccia Bread
Ingredients:
For the Biga
1/2 cup flour
1/3 cup warm water (100-110 degrees F)
1/4 teaspoon instant or rapid-rise yeast

For the Dough
2 1/2 cups flour, plus extra for shaping
1 1/4 cups warm water (100-110 degrees F)
1 teaspoon instant or rapid-rise yeast
Kosher salt
4 tablespoons extra-virgin olive oil
2 tablespoons Italian or garlic bread seasoning

Directions:
To make the biga, combine flour, water, and yeast in large bowl and stir with wooden spoon until uniform mass forms and no dry flour remains, about 1 minute. Cover bowl tightly with plastic wrap and let stand at room temperature (about 70 degrees) overnight (at least 8 hours and up to 24 hours).

To make the dough, stir flour, water, and yeast into biga with wooden spoon until uniform mass forms and no dry flour remains, about 1 minute. Cover with plastic wrap and let rise at room temperature for 15 minutes.

Sprinkle 2 teaspoons salt over dough; stir into dough until thoroughly incorporated, about 1 minute. Cover with plastic wrap and let rise at room temperature 30 minutes. Spray rubber spatula or bowl scraper with nonstick cooking spray. Use spatula to fold partially risen dough over itself by gently lifting and folding edge of dough toward middle. Turn bowl 90 degrees and fold again. Turn bowl and fold dough 6 more times (for a total of 8 turns). Cover with plastic wrap and let rise for 30 minutes. Repeat folding, turning, and rising 2 more times, for total of three 30-minute rises. Meanwhile, adjust oven rack to upper-middle position and heat oven to 500 degrees at least 30 minutes before baking.

Transfer dough to lightly floured counter. Lightly dust top of dough with flour. Coat a baking sheet with 4 tablespoons olive oil. Sprinkle sheet with 1/2 teaspoon salt. Place dough on sheet, slide dough around pan to coat bottom and sides, then flip over. Cover pan with plastic wrap and let rest for 5 minutes.

Using fingertips, press dough out toward edges of pan. (If dough resists stretching, let it relax for 5 to 10 minutes before trying again.) Using dinner fork, poke surface of dough 25 to 30 times, popping any large bubbles. Sprinkle seasoning evenly over top of dough. Let dough rest until slightly bubbly, 5 to 10 minutes.

Place pan in oven abd reduce temperature to 450 degrees. Bake until top is golden brown, 25 to 28 minutes (in my oven, that was just 15 minutes - so keep an eye out!), rotating pan halfway through baking. Transfer pan to wire rack and let cool 5 minutes. Remove loaf from pan and return to wire rack. Brush top with any oil remaining in pan (I had none, sadly enough). Let cool 30 minutes before serving (good luck - Bill was slicing into ours shortly after baking!).

Sunday, November 13, 2011

Pumpkin Pie Throwdown!

Fall is by far my favorite season. I love sweater weather, I love simmering pots of stew and soup on the stove, I love the firey bright orange and red leaves outside, and above all, I love pumpkin!

I can't get enough of all things pumpkin. Pumpkin breads, pumpkin cheesecake, pumpkin cupcakes, pumpkin ice cream, pumpkin lattes ... I could go on forever! But it all started with the original: good ol' pumpkin pie. As a kid, pumpkin pie was a once or twice a year treat. An aunt would bring it to our house for Thanksgiving and I might be lucky enough to snag a slice at Christmas, but anything pumpkin was noticeably absent the rest of the year.

Not so in my house now. The first leaves haven't even fallen from the trees before I pump up the pumpkin baking. So when Bill set out to bake a from-scratch pumpkin pie a few weeks ago, I was all for it. It came about when we got our hands on Alton Brown's latest Good Eats cookbook. As often happens when you place a new cookbook in Bill's hands, he put his mind to one of the most involved recipes. And as often happens when Bill succeeds in the kitchen, my competetive spirit kicked in.

I suggested we go head to head and instantly began strategizing. Bill stuck with Alton's recipe and I sought out the most delicious recipe I could find from Martha Stewart. While it took Bill one carving pumpkin, two pies, four pie pumpkins, and dozens of gingersnaps to get it right, his final entry in this throwdown was quite good. It was so good, in fact, that I was a little fearful of how my own pie would fare.

Bill and I knew we couldn't objectively judge our own pies, so I decided to take two slices to one of the only people I know who loves pumpkin as much as I do: my boss, Molly. I should have been completely confident that I had this competition in the bag, but when Bill and I did our own taste test the night before we were both surprised to find that we couldn't decide between the two. Our pies were so different, and both so good. But in the end, Molly described Bill's as "pumpkin purist," which put him on top. Mine had a touch more spice than a traditional pumpkin pie, which I loved, but I can understand that it doesn't suit everybody's taste.

So take your pick: Bill's pumpkin purist pie, or my super spicey slice. I'd make either one again!

Jen's Martha Stewart Pumpkin Pie
Ingredients:
For Shortbread Crust
4 tablespoons butter, softened
3 tablespoons sugar
1 egg yolk
1 cup flour
1 teaspoon salt

For Filling
1 1/2 cups fresh pumpkin puree
1 cup heavy cream
3/4 cup sugar
1 teaspoon vanilla
1 teaspoon salt
1 teaspoon cinnamon
1/2 teaspoon ginger
1/4 teaspoon allspice
2 eggs, lightly beaten

Directions:
To make crust, stir together butter and sugar in a medium bowl. Stir in yolk. Add flour and salt, and stir until mixture is dry and crumbly. Press dough into bottom and up sides of a 9-inch pie dish. Freeze until firm, about 20 minutes. Meanwhile, preheat oven to 375 degrees.

Bake, rotating halfway through, until crust turns golden brown, 20 to 22 minutes. Let cool in dish on a wire rack.

To make pumpkin puree, preheat oven to 400 degrees. Cut several slits in pumpkin with a sharp paring knife. Place pumpkin (Martha calls for one about 1 1/2 lbs.) in a baking dish and pour about 1 inch of water in the bottom of the dish. Bake until skin is easily pierced and inside is soft, about 1 to 1 1/2 hours.

While pumpkin is still warm, rip off stem, peel off skin, and scoop out seeds. Place pumpkin in food processor and puree until smooth. Set aside.

To make filling, whisk together pumpkin, heavy cream, sugar, vanilla, salt, cinnamon, ginger, allspice, and eggs in a large bowl. Pour filling into prepared pie crust.

Preheat oven to 325 degrees. Place pie dish on a rimmed baking sheet. Bake, rotating halfway through, until filling is just set and slightly puffed but still a bit wobbly, about 65 to 70 minutes. Transfer to a wire rack and let cool completely. Serve chilled, topped with whipped cream.


Bill's Alton Brown Pumpkin Pie
Ingredients:
For Gingersnap Crust
6 oz. gingersnap cookies
1 tablespoon brown sugar
1 teaspoon ginger
1 oz. butter

For Filling
16 oz. fresh pumpkin puree
1 cup half and half
1/2 teaspoon nutmeg
1/2 teaspoon salt
3/4 cup brown sugar
2 eggs
1 egg yolk

Directions:
To make pumpkin puree, preheat oven to 400 degrees. Slice a small piece of skin off one side of the pumpkin so when laid on its side the pumpkin won't roll. Remove stem and split pumpkin in half from top to bottom. Scoop out the seeds and fiber.

Sprinkle flesh with salt and lay the halves, flesh side down, on a sheet pan lined with parchment paper. Roast 30 to 45 or until a paring knife can be easily inserted and removed from the pumpkin. Test in several places to ensure doneness.

Remove sheet pan to a wire rack and cool pumpkin for 1 hour. Using a large spoon, remove roasted flesh of pumpkin from skin and transfer to a food processor. Process 3 to 4 minutes, until very smooth.

To make crust, combine gingersnaps, brown sugar, and ginger in a food processor. Process until cookies are fine crumbs. Drizzle butter into crumb mixture. Pulse 8 to 10 times to combine.

Press gingersnap mixture into bottom and up sides of a 9-inch pie dish. Place on a sheet pan and bake 10 to 12 minutes, until lightly browned. Cool crust at least 10 minutes before filling.

To make filling, bring pumpkin puree to a simmer in a saucepan over medium heat. Cook, stirring occasionally, 2 to 3 minutes, or until slightly thickened. Add half and half, nutmeg, and salt. Stir and return to a simmer. Remove from heat and cool 10 minutes.

Whisk brown sugar, eggs, and egg yolk in a large bowl. Add pumpkin mixture and whisk until thoroughly combined. Pour filling into warm pie crust and bake on same sheet pan 45 to 50 minutes, until the center jiggles slightly but sides of filling are set. Cool on a wire rack at least 2 hours before slicing.

Tuesday, November 8, 2011

Tagine Machine

You know what I love? Coming across a dish I've never heard of, being intrigued enough to give it a go in the kitchen ... and pulling it off!

I don't like to admit that I'm sometimes inspired by Rachael Ray, but every so often I catch an episode of her show "A Week in a Day" and she makes something that sounds simply delicious. Last week I saw her make a Moroccan meatball tagine in a tomato sauce with poached eggs and I was tempted. Not being very familiar with tagines, I did a bit more research and came across a lot of recipes. I also learned that what Rachael made is called kefta,one of several traditional tagine styles. I decided I might have to warm Bill up to the idea of Moroccan food before I set out to replicate Rachael's dish, and so I chose another recipe that I thought might be a good stepping stone.

What intrigued me most about this Chicken Tagine with Tomato Chutney was the tomato chutney. And it turns out it made the dish! It was to die for. It was a little tangy from the red wine vinegar, a little spicy from the cayenne, and a little sweet from the sugar. It was an awesome complement to the sweetness of the chicken and vegetables, which really took on the flavor of the ginger and cinnamon they'd cooked in. The chutney was so delicious that now I'm looking for other applications for it. I'm thinking it might be a good substitute as a kicked up chicken parmesan topping, or even bruschetta.

Funny enough, the recipes I came across rarely asked you to actually use a tagine, the cooking implement from which the dish gets its name. Good thing, because the last thing I need is another one-use wonder gadget in my kitchen :) Oh, and Rachael's recipe? This North African version of a tagine went so well that I'm thinking of moving on to the Moroccan dish this weekend!

Chicken Tagine with Tomato Chutney
Ingredients:
For tomato chutney
2 1/2 cups water
4 Roma tomatoes, chopped
1/4 cup red wine vinegar
1/4 cup sugar
1 teaspoon fresh ginger, grated
1/2 teaspoon cayenne pepper
Salt
For rice
2 tablespoons onion, finely chopped
1 tablespoon olive oil
1 cup long grain white rice
1/4 teaspoon pepper
1/4 teaspoon cumin
1 1/2 cups chicken broth
Salt
For chicken tagine
1/3 cup chopped onion
1 tablespoon olive oil
2 boneless skinless chicken breasts, cut into strips
1 teaspoon ginger
1 teaspoon cinnamon
2 cups chicken broth
1 zucchini, cut into julienne strips
1 leek, white parts cut into julienne strips
Salt and pepper

Directions:
For the chutney, place all ingredients in a small saucepan and bring to a boil for 10 minutes. Reduce heat and simmer until water has completely evaporated and the sauce has thickened into a jam-like consistency, about 30 minutes. Reserve.

In another saucepan, saute onion in olive oil, about 5 minutes. Add rice, pepper, and cumin and stir to combine. Add broth and salt, and bring to a boil for 2 minutes. Reduce heat to low, cover tightly, and cook for 20 to 25 minutes, or until rice is al dente.

In a saute pan over medium-high heat, saute the onion in olive oil until translucent. Add chicken strips and saute until almost golden on all sides. Add ginger, cinnamon, and broth and bring to a boil. Reduce heat and simmer 15 minutes. Add zucchini and leeks and cook 5 minutes. Remove from heat and season to taste with salt and pepper.

Serve chicken and vegetables over rice. Top with a dollop of chutney.

Sunday, November 6, 2011

My Husband, the Chef

It's not often that I feature one of Bill's (rare) dinners on LoVBites, but this week he made an amazingly delicious meal and I felt obligated to document the occasion. He's been watching quite a bit of Food Network lately, and because he's home during the day he actually catches the cooking shows (you know, where someone relays a recipe instead of racing against the clock in a competition). Well, every once in a while, one of those shows inspires him.

This week, Bill caught Ina Garten's "Barefoot Contessa" and she was making chicken piccata with roasted onions and buttermilk mashed potatoes. Sounds yummy, right? Bill certainly thought so, so he recorded the episode, printed the recipes from the website, and made me a gourmet meal on Friday night!

It seems the trick to Bill's most successful dishes is that he needs to watch them be prepared before setting out on his own in the kitchen. Ina sure was a good instructor, because this meal was probably the best Bill's ever made! The chicken was perfectly done, tender and completely moist. The onions were amazing, sweet and just a bit tangy from the lemon dressing. And the potatoes (which required a little bit of improvisation because our buttermilk was expired), were the creamiest and smoothest I've EVER had!

Bill tossed his printed recipes in the trash after dinner and I had a mini meltdown. "What are you doing!?" I squealed. He looked at me and said, "What?" "Don't throw the recipes away! I want you to make this again," I said. Mr. Over-confident said, "I will, and I don't need the recipes."

Well then.

Chicken Piccata with Roasted Onions and Mashed Potatoes
Ingredients:
2 boneless, skinless chicken breasts
Salt and pepper
1/2 cup flour
1 egg
1/2 tablespoon water
3/4 cup seasoned dry bread crumbs
Olive oil
3 tablespoons butter, room temperature, divided
1/3 cup freshly squeezed lemon juice, lemon halves reserved
1/2 cup dry white wine

Directions:
Preheat oven to 400 degrees. Line a sheet pan with parchment paper.

Place each chicken breast between 2 sheets of plastic wrap and pound out to 1/4-inch thick. Sprinkle both sides with salt and pepper.

Mix flour, 1/2 teaspoon salt, and 1/4 teaspoon of pepper in a shallow plate. In a second plate, beat egg and 1/2 tablespoon of water together. Place bread crumbs on a third plate. Dip each chicken breast first in flour, shake off excess, then dip in egg and then bread crumb mixture.

Heat 1 tablespoon olive oil in a large saute pan over medium to medium-low heat. Add chicken and cook 2 minutes on each side, until browned. Place chicken on sheet pan and bake 5 to 10 minutes while you make the sauce.

For sauce, wipe out saute pan with a dry paper towel. Over medium heat, melt 1 tablespoon butter and  add lemon juice, wine, reserved lemon halves, 1/2 teaspoon salt, and 1/4 teaspoon pepper. Boil over high heat until reduced by half, about 2 minutes. Off the heat, add remaining 2 tablespoons butter and swirl to combine. Discard lemon halves and serve chicken breasted with sauce spooned over.

Herb-Roasted Onions
Ingredients:
2 red onions
1 yellow onion
2 tablespoons freshly squeezed lemon juice
1 teaspoon minced garlic
1/2 tablespoon minced fresh thyme leaves
3/4 teaspoon salt
1/4 teaspoon pepper
1/4 cup olive oil

Directions:
Preheat oven to 400 degrees.

Remove stem end of each onion and carefully slice off the brown part of the root end, leaving the root intact. Peel each onion. Stand each onion root end up on a cutting board and cut in wedges through the root. Place wedges in a bowl.

Combine lemon juice, garlic, thyme, salt, and pepper in a large bowl. Whisk in olive oil. Pour mixture over onions and toss well.

With a slotted spoon, transfer onions to a baking sheet, reserving dressing that remains in bowl. Bake 30 to 45 minutes, until tender and browned, tossing once during cooking. Remove from oven, and drizzle with reserved dressing. Serve warm or at room temperature.

(Sort of) Ina's Mashed Potatoes
Ingredients:
3 Yukon gold potatoes
1/2 cup milk
4 tablespoons butter
1/4 teaspoon pepper

Directions:
In a large pot, bring 2 quarts water and 1 tablespoon salt to a boil. Peel potatoes and cut into 1 1/2-inch cubes. Add potatoes to boiling water and bring water back to a boil. Lower heat and simmer, uncovered, 10 to 15 minutes, until potatoes fall apart easily when pierced with a fork.

Meanwhile, heat milk and butter in a small saucepan, making sure it doesn't boil. Set aside until potatoes are done.

When potatoes are tender, drain them in a colander. Place in a large bowl and mash with potato masher. Stir in hot milk mixture with a whisk. If necessary, add more milk to make potatoes creamy. Season with salt and pepper, and serve hot. To keep potatoes warm while finishing the meal, place bowl over a pan of simmering water for up to 30 minutes.

Thursday, November 3, 2011

Going Dutch

The number of recipes that arrive in my inbox each week is astronomical. I can barely keep up with the various newsletters and one-offs, but I try to skim them all and weed out those with the most potential. I probably file away at least half a dozen a week with good intentions to give them a shot, but more often than not they disappear into the abyss of that folder labeled "Recipes."

Every so often, however, I come across an email with a recipe I have to make immediately. And for reasons I can't quite explain, this Dutch Apple Cake was one of them.

I first made this cake about a year ago when I saw the recipe in an email from Taste of Home. I'm a sucker for anything involving apples, but I'm sometimes skeptical of those Taste of Home recipes ... perhaps America's housewives have different taste than we do, but their dishes don't always fare well in my home. This was certainly the exception!

I'm in love with this cake because it's super moist, and apple-icious. It's also super dense and egg-y, resembling something closer to bread pudding than cake. I've made it multiple times now, and it's consistently amazing (and it makes a great gift ... this is the treat I left for the owner of the cottage we rented in the Hamptons and she loved it!).

Dutch Apple Cake
Ingredients:
3 medium tart apples, peeled and sliced
3 tablespoons plus 1 cup sugar, divided
1 teaspoon cinnamon
2/3 cup butter, softened
4 eggs
1 teaspoon vanilla
2 cups flour
1/8 teaspoon salt

Directions:
Preheat oven to 300 degrees. In a large bowl, combine apples, 3 tablespoons sugar and cinnamon. Set aside.

In a separate bowl, beat butter and remaining sugar until light and fluffy. Add eggs, one at a time, beating well after each addition. Add vanilla. Combine flour and salt and gradually add to butter mixture. Beat until smooth. Fold in apples and transfer batter to greased loaf pan. 

Bake 1 to 1 1/2 hours or until toothpick inserted near center comes out clean. Cool in pan 10 minutes, then transfer loaf to wire rack.

Sunday, October 30, 2011

It's Soup Season

I heart my Dutch oven. And it's going to be getting quite a workout over the next several months, as we have now hit full blown soup season.

I'll make big pots of soup, strew, and chili all year long, but I definitely pick up the pace come cooler weather. There's something about the brisk Fall air that just begs me to simmer something on the stovetop. I have my favorite recipes that I find myself frequently going back to, but I also add a few new soups to my repertoire each year. Turns out this year I'm obsessed with lentils.

Last month I made an amazing pot of lentil and sausage soup that was a near-exact replica of our favorite soup at Carraba's. Just the other night, I had a cup of vegetarian lentil soup at Louise's that was almost as good and had me craving more. Lucky enough, I stumbled across this recipe in the latest issue of Taste of Home. This satisfied my lentil longing, with just a couple minor tweaks (theirs was also vegetarian, but what fun is that? I added sausage).

Lentil Tomato Soup
Ingredients:
1 teaspoon olive oil
1 Italian chicken sausage link, casing removed
5 cups water
4 carrots, sliced
1 onion, chopped
3/4 cup dried lentils
3 oz. tomato paste
1 tablespoon brown sugar
1 tablespoon white vinegar
1 teaspoon garlic powder
1/2 teaspoon dried thyme
1/4 teaspoon dill weed
1/4 teaspoon pepper

Directions:
Heat oil in Dutch oven over medium-high heat. Cook sausage until no longer pink, about 5 minutes. Using a slotted spoon, remove sausage to paper towel-lined plate. Set aside. Do not clean Dutch oven.

Add water, carrots, onions, and lentils to Dutch oven. Bring to a boil. Reduce heat, cover, and simmer 20 to 25 minutes or until vegetables and lentils are tender. Stir in remaining ingredients, including sausage. Return to a boil, reduce heat, and simmer, uncovered, 5 minutes.

Wednesday, October 26, 2011

New York Noshing

I realized yesterday that we returned from our New York vacation more than a month ago. And in that time, I've promised on more than one occasion to write a savory summary of our trip. Well work got hectic and time got away from me, so I'm sorry for the delay!
Being the food nut that I am, you'd expect that our week away consisted of non-stop nibbles. As much as I wish that were true, I just couldn't do it. I would have absolutely exploded had I tried to eat everything I was tempted to try! So here's a rundown of the most notable noshes you need to know about.

Tasting Timeline
Day 1: Testing Our Cottage Kitchen
One of the reasons I was excited to be shacking up in Southampton for the week was that I'd be able to cook a few of our meals! After a tiring day of travel, we weren't in the mood to explore the area on the day we arrived, so we followed the directions to the nearest grocery store and I made a delicious dinner that night.

I was inspired by the pasta making class we'd just taken at the Public Market a few days before, so I chose to whip up some beef braciole with homemade tomato sauce and roasted potatoes and peppers. I need to make this again, and when I do you'll be sure to see the recipe here. Stuffed with cheese and bread crumbs, rolled up, and broiled, this braciole was awesome! A nice start to the week, but one of only two or three times I actually found myself in the kitchen while we were away :)

Day 3: A Montauk Masterpiece
Seeing as how we were in the Hamptons, I felt the need to have something fresh and local. Well it turns out there's no better way to experience that than to stop at a place the locals affectionately refer to as "Lunch."

The Lobster Roll in Amagansett purports to be the originator of the lobster roll (which I suppose makes sense, when you consider it). I can say with conviction that it was the best lobster roll I've ever had ... although if memory serves me correctly it might be the only lobster roll I've ever had. Regardless, it was delish. Massive, tender chunks of sweet lobster in just the right amount of mayo stuffed in a super soft roll ... yum! (The mayo kept Bill from digging in, but hey, more for me.)


Day 4: Fuggedaboutit, I'm Full
So on the fourth day of our trip we found ourselves in NYC. My food mecca, right? There were dozens of things I wanted to eat, but I failed. Perhaps we started off on the wrong foot (quite literally because our three-mile walk there ate up my heels) by trekking to Katz's Delicatessen.
If you don't know Katz's, you don't know New York. Or perhaps you just don't watch the Food Network. Just the night before we'd seen an episode of "The Best Thing I Ever Ate" where Chef Michael Psilakis was touting their knoblewurst sandwich as the best thing he ever ate with garlic. But that's not what made us go there. Katz's came highly recommended by a couple friends who lived in the city, so we had to try it. Bill actually ordered the knoblewurst (which was amazing!) and I had the predictable (but equally amazing) corned beef. We were promptly stuffed. But was it worth it? Hell yes!

Luckily, we had miles and miles yet to walk in the city (and luckily I changed shoes). We burned off enough calories to pick up some goodies from Ferrara Bakery & Cafe in Little Italy. I had a box made up with a couple biscotti, mini cannoli, and a few Italian cookies. Then I found even more delicious cannoli from a vendor down the street so I bought more! The best part about cannoli in Little Italy? They come in every flavor imaginable. I had a traditional, then topped that off with one filled with coconut cream, one filled with espresso ricotta, and one filled with Nutella. O. M. G.
Now you might be wondering, "Where's the pizza?" Since it's Bill's all-time favorite food, it had to show up somewhere. Truth be told, we spent hours searching for the perfect slice, but he just couldn't commit. Finally, when we were just about ready to leave, he popped into the last place we passed. And it turns out it was a Famous Famiglia ... which is a chain that just happens to have a home in the Milwaukee airport. Talk about a disappointing way to end the day! I knew we should have picked up takeout when we passed Junior's instead.

Day 7: Homestyle in the Hamptons
By the end of our trip, we were worn out. We spent our last day retracing our steps near the cottage and taking another drive up Montauk Highway. When we were hungry for lunch, we turned to trusty Trip Advisor. You wouldn't think of seeking out barbecue in the Hamptons, but a place called Townline BBQ had some pretty decent reviews so we gave it a shot. And I'm glad we did!
I have a minor obsession with burnt ends, which you don't see on an awful lot of menus in our neck of the woods. There's nothing more delicious to me than the crisp, smoky, flavorful cuts from the end of the meat. The special on the day we visited Townline was burnt end sliders. My choice was a no brainer ... and I wasn't disappointed! The sliders were served on potato rolls with sides of potato salad and roasted beets and sweet potatoes. I could have done with out the sides and more ends, please! I really, really wanted to walk out of Townline with one of their yummy-looking whoopie pies, but once again I just didn't have the room.

Other Notable Noshes
'Wichcraft Oatmeal Cream'wich I would have loved to eat at one of Tom Colicchio's 'Wichcraft locations because their sandwiches look amazing. A few days before we left on our trip I'd seen an episode of "Unique Sweets" on the Cooking Channel in which they featured 'Wichcraft's sandwich cookies. As luck has it, we were trying to find our way out of Rockefeller Center and came across a 'Wichcraft in the basement. So I popped in for a cookie! That oatmeal cream'wich was every bit as yummy as it looked on T.V.

The Dark Horse Pork Loin T-Bone Our last dinner in Southampton was at a restaurant that had been reviewed in a local paper. I didn't have much faith, considering we'd attempted to go there a few nights before and the place was completely empty ... void of servers and all! They redeemed themselves on Friday night with the pork loin t-bone, which was so delicious that Bill polished off my plate after he finished his own. I've never had a juicier, more tender, more flavorful piece of pork. And unless we make a return trip to Southampton, I can't imagine I ever will!

My Dutch Apple Cake Before we vacated our home away from home for the week, I felt the need to leave a parting gift for our gracious hostess, Amy. Naturally, that gift came in the form of baked goods. I don't believe I've shared this recipe with you yet, but I promise I will soon (especially since apple season is upon us). My Dutch Apple Cake is really more like bread pudding in loaf form because it's very heavy on the eggs ... but that's what makes it moist and rich and delicious! I baked a loaf for the homeowner and was able to squeeze out a mini loaf that Bill and I shared for dessert the night before. This is one of my favorite fall desserts, and an appreciative text message from Amy told me she loved it, too!

All in all, we had a terrific time. My only regret is not eating more (although my bathroom scale certainly doesn't agree). You know what that means ... we need to head back to the city soon!

Tuesday, October 25, 2011

Boo-tiful Meringue Ghosts!

I've been itching to get back into the kitchen because it's been nearly two weeks since I've had a chance to cook. Work has been so busy and I've been so exhausted! But fortunately, that didn't keep me from cranking out some cupcakes just in time for Halloween!

My two creations last week were chocolate cupcakes (using my favorite Test Kitchen recipe) topped with chocolate frosting (from a can ... eek!) and ghost sprinkles (an adorable find from Sendik's) and white chocolate cupcakes (my very own recipe, which I'll share when I'm confident it's perfected) topped with chocolate ganache and ... the cutest meringues you've ever seen!

My good friend Sue sent me this recipe several weeks ago, and I was immediately anxious to try it ... despite the fact that I've never liked meringue. For as long as I can remember, I've been scraping meringue off of lemon pies, avoiding it in baked Alaskas, and shunning the baked meringues that some people try to pass off as cookies. But these little guys were so cute that I was willing to give meringue a break. I figured they'd make awesome cupcake toppings, even if they tasted gross.

Well I'm still going to scrape the meringue off of my pie, but it turns out I didn't know what I was missing when it came to those cookies. When meringues are homemade they're like heaven melting in your mouth. Smooth and sweet with just the right amount of crunch, these ghosts are as tasty as they are adorable!

Meringue Ghosts
Ingredients:
2 large egg whites
1/2 teaspoon cream of tartar
1/2 cup superfine sugar (see note)
1/4 teaspoon vanilla extract
Edible ink pen

Directions:
Place rack in center of oven and preheat oven to 200 degrees. Line a baking sheet with parchment paper. Have a pastry bag (or large ziploc bag) ready.

In a large bowl, beat egg whites with an electric mixer on high speed until foamy. Add cream of tartar and continue to beat until egg whites hold soft peaks. Add sugar, a little at a time, and beat on the highest possible speed until egg white hold very stiff peaks, about 10 minutes. (The sugar should also completely dissolve. Rub a bit of meringue between your fingers - if it feels gritty, continue to beat until it's as smooth as possible.) Beat in vanilla extract.

Before filling your piping bag, dab a bit of meringue under each corner of the parchment to adhere it to the baking sheet. (This will prevent it from sliding on its way in and out of the oven!) Transfer meringue to piping bag and, holding bag perpendicular to baking sheet, pipe 2-inch high mounds of meringue.

Bake meringues 1 to 1 1/2 hours or until dry and crisp to the touch. Turn oven off, crack oven door, and allow meringues to dry in oven several hours or overnight. Use an edible ink pen to draw eyes and mouths on your ghosts. Boo-tiful and delicious!

Saturday, October 15, 2011

Super Soup: Chicken and Dumplings

I can feel a case of the soups coming on. It happens every year around this time ... the weather turns chilly and I'm suddenly compelled to make giants pots of soup in quantities large enough to feed an army. Never mind the fact that I'm just cooking for two. Soup is one of the only big-batch dishes I can make and never end up with leftovers. Bill and I love it that much.

Thursday night's supper (and it feels appropriate to call it that in true Southern fashion) may rank right up there with my favorites: Chicken and Dumplings. I have absolutely no recollection of the first time I had chicken and dumplings. You don't see it pop up on too many California menus and it's certainly not something my mom ever made. Maybe it wasn't until I moved to Wisconsin that I gave it a whirl. And even then, I'm sure I never tasted the real thing. But as far as imposters go, I think I've found a pretty good one.

In the interest of full disclosure, I have to note that this particular recipe requires a few shortcuts I normally wouldn't take. But for a hearty weeknight meal, I'm sometimes willing to resort to cans and boxes.

Chicken and Dumplings
Ingredients:
Cooking spray
1 cup onion, finely chopped 
1 garlic clove, minced
Salt and pepper
1/4 cup marsala wine 
3 1/2 cups chicken broth
1 can reduced-fat, reduced-sodium condensed cream of chicken soup, undiluted

1/4 cup water
2 tablespoons cornstarch
2 cups baking mix (such as Bisquick)
2/3 cup buttermilk
3 boneless, skinless chicken breasts, cut into 1-inch pieces
3 carrots, chopped
1 cup frozen peas

Directions:
Heat a Dutch oven over medium high heat and coat with cooking spray. Add onions and garlic and cook until softened, about 5 minutes. Sprinkle with salt and pepper, then add marsala, broth, and condensed soup. Bring to a boil.

In a small bowl, combine water and cornstarch; stir until cornstarch is dissolved. Set aside.

In a medium bowl, combine Bisquick and buttermilk. Stir until stiff dough forms; knead into a ball. Set aside.

Add chicken and carrots to pot. Stir in cornstarch mixture. Tear off 1-inch pieces of dough and drop into pot. Return to a boil, lower heat, cover, and simmer, stirring occasionally, until chicken and dumplings are cooked through, about 20 to 25 minutes. (Test dumplings for doneness by removing one and piercing it with a fork - they're finished when the fork comes out clean.)

Add peas to pot and cook soup another 5 minutes, stirring occasionally. Serve piping hot in big bowls!

Tuesday, October 11, 2011

From Biscuit to Brisket

I was totally channeling Paula Deen and her fellow Southern cooks this weekend. In addition to the fantastic sweet potato biscuits I blogged about yesterday, I also braised a brisket and made caramel-banana custard (I'll get to that later this week!).

Now my original intention was to barbecue that brisket, which would have been even more Southern. But I got a bit of a late start and was afraid three to four hours wouldn't be enough smoking time on the grill. Based on past experience, I knew that would be just the right amount of time for braising (you typically need about an hour per pound), so into the oven it went.

The last time I braised a brisket, it was with a recipe from Cooking Light. This one was also inspired by Cooking Light, but modified quite a bit from the original recipe to reduce the number of steps involved! Now you know I'm normally not apt to simplify a recipe, but I just didn't have the energy for the straining, re-boiling, de-fatting, and thickening this recipe called for. And so I decided to forgo the fancy sauce and simply spoon some of the cooking liquid over the meat instead. The verdict? It was still one of the most flavorful, super tender, delicious briskets I've ever had. And it was even better on a sandwich the next day!

The shredded bits are a-maz-ing!
Braised Beef Brisket
Ingredients:
1 (3-4 lb.) beef brisket, fat trimmed but not completely removed
2 cloves garlic, minced
1 teaspoon dried thyme
Salt and pepper
1 tablespoon olive oil
3 cups beef broth
1/2 cup red wine, such as merlot
1/2 cup red wine vinegar

Directions:
Preheat oven to 350 degrees. Cut shallow slits in top of brisket.

In a small bowl, combine garlic and thyme. Stuff garlic mixture into slits in meat. Season with salt and pepper. Rub meat with olive oil.

Heat a Dutch oven over medium-high heat. Sear meat on all sides, beginning with oiled side. Remove meat to plate and set aside. Add broth, wine, and vinegar to Dutch oven. Bring to a boil. Place meat back in pot and place pot in oven.

Cook 3 to 3 1/2 hours, turning twice. Remove from oven, allow to rest 10 minutes, slice and serve.

If you want to go to fuss with the fancy sauce ...
After 2 hours of cooking (and 1 turn), strain the cooking liquid from the pot through a fine mesh strainer into a 2-cup measuring cup. Pour liquid into large, zip-top bag. Snip a hole in one corner of the bag and squeeze liquid into small saucepan, stopping before reaching the fat layer. Bring to a simmer, return to Dutch oven, add meat, and cook an additional hour.

Monday, October 10, 2011

Love at First Bite: Sweet Potato Biscuits

I LOVE sweet potatoes. I always have and always will. All I need is a piping hot, baked sweet potato and a fork ...no butter, no brown sugar, no salt and pepper, nothing. It's the only food I can think of that is absolutely perfect on its own, no embellishments required.

Unfortunately, Bill doesn't agree with me. He's never liked sweet potatoes and thought he never would. So I decided to get a little sneaky.

I braised a brisket yesterday (which I'll get to in a day or so because it was a-maz-ing), and told Bill I was baking biscuits to go with it. I wasn't going to mention the sweet potato part because, seriously, what he doesn't know can't hurt him. I knew he'd figure it out when I put the plate on the table, or at the very least when he took a bite. But I figured keeping it quiet gave him less of a chance to put up a fight.

Then he walked into the kitchen while I was mashing the sweet potato. Whoops. There was no more hiding it - I had to admit to my scheme. Luckily he went along with it and he gave them a fair chance. Now for me, it was love at first bite with these biscuits. They're DELICIOUS! Bill agreed that they were good, but they didn't leave him looking for seconds.

This recipe came from the Mary Mac's Tea Room cookbook, which my good friend Sue brought back for me the last time she was in Atlanta. It's endorsed by Paula Deen, so you know it's got to be good Southern food. I absolutely must go here, especially if these biscuits were any indication of the deliciousness I'll find!

I should note that I cut the recipe in half, which should have produced (a reasonable) six biscuits. Instead, I ended up with ten. That leads me to believe that Mary Mac must make biscuits as big as your head. (Not that there's anything wrong with that.)

Sweet Potato Biscuits
Ingredients:
1 1/2 cups flour
1/3 cup sugar
1 tablespoon baking powder
1/8 teaspoon baking soda
3/4 teaspoon salt
4 tablespoons butter
1 cup mashed sweet potatoes (baked)
1 tablespoon buttermilk

Directions:
Preheat oven to 400 degrees. Grease baking sheet and set aside.

In a medium bowl, combine flour, sugar, baking powder, baking soda, and salt. Cut in butter (with a pastry cutter or two knives) until mixture resembles coarse cornmeal. Stir in mashed sweet potatoes (I discovered that the pastry cutter also works well for mixing these in ... and has the added advantage of giving you a smoother mash!). Stir in buttermilk until dough comes together in a ball (at this point, you're really pressing the dough against the sides of the bowl to ensure it all comes together).

On a lightly floured surface, press dough into a 1/2-inch thick circle. Use a biscuit cutter to cut out rounds (roll and cut the scraps until there's nothing left). Bake 15 to 18 minutes or until golden brown.

Saturday, October 8, 2011

Asian Persuasion

Bill seems to get a hankering for Chinese food at least once a week, but we rarely indulge that craving with take out (although I pretty sure he hits up a Chinese buffet for lunch about that often.) I'm a big fan of Chinese food, but we don't order in often because there are other things I'd much rather blow my calories on (like frozen custard).

So in several attempts to satiate Bill's taste for take out, I've attempted a few Asian-style dishes. I've produced a decent stir fry here and there, I've made great fried rice, and I even made fried won tons. These dishes have always turned out satisfactory, but they're not necessarily mind-blowingly good substitutes for the real thing. It's one of those things that just doesn't taste as good if you're not eating it from a take out carton. Something's missing (perhaps it's the MSG).

This week I took on lo mein, and Bill insists it was as delicious as any he's ever had. I'm still convinced it was good but not great, although I'd definitely make it again. It's super simple and super speedy, so give it a try and let me know what you think!

Pork Lo Mein
Ingredients:
1/2 lb. thin cut boneless pork chops, thinly sliced
2 cups sugar snap peas
1 cup carrots, sliced into 1/4-inch sticks
1 package (9 oz.) refrigerated linguine
1/3 cup chicken broth
1 tablespoon soy sauce
2 teaspoons cornstarch
1 teaspoon sugar
2 teaspoons fresh ginger, minced or grated
2 cloves garlic, minced or grated
2 teaspoons vegetable oil
1/2 cup red onion, thinly sliced
Toasted sesame seeds

Directions:
In a 3-quart saucepan, bring 2 quarts water to boiling. Add pea pods, carrots, and linguine. Return to a boil.Boil 2 to 3 minutes, or until linguine is tender. Drain.

In a small bowl, whisk together broth, soy sauce, cornstarch, sugar, ginger, and garlic. Set aside.

In a 12-inch non-stick skillet or wok, heat vegetable oil over medium-high heat. Add pork and onion. Stir fry about 2 minutes or until pork is no longer pink. Stir broth mixture into skillet. Stir in drained pea pods, carrots, and linguine. Cook 2 minutes, stirring occasionally. Sprinkle with sesame seeds and serve.

Tuesday, October 4, 2011

I Swoon for Macarons: Part II

French macarons are becoming the new cupcake - a classic dessert that has suddenly been reinvented and transformed into haute couture. The only difference is that where cupcakes were transformed from classically comfortable to surprisingly fancy, French macarons have turned from classically sophisticated to much more approachable. If you're a fan of all shows Bravo (as I am), you'll appreciate this comparison: What pastry chefs have done for cupcakes is what Chris March has done for costume gala gowns, and what home bakers have done for French macarons is what Rachel Zoe has done for Chanel.

I was completely unfamiliar with French macarons until I saw Wolfgang Puck sing their praises on an episode of "The Best Thing I Ever Ate." That inspired me to seek them out at the very place Wolfgang recommended you have them - Payard Patisserie & Bistro inside Caesar's Palace, Las Vegas. I documented that mind-blowing moment here, and French macarons immediately went on my recipe wishlist.
It wasn't until I came across a French macaron cookbook at TJ Maxx this weekend (yet another indication that they're now everywhere) that I remembered they were on my to-make list. And so I was determined to do so on Sunday. (For those of you who are wondering, yes, I did make these at the same time as my deep dish pizza. I do not recommend attempting to accomplish both of these challenging recipes at once.)

Before you set out on the French-macaron-making mission that I did, there are a few very important questions you must ask yourself ... First, do you have a store nearby carrying almond flour? Second, are you willing to spend $12.49 for 16 ounces of said almond flour? So as not to compromise the recipe, I answered yes to both questions. I was lucky enough to find almond flour at Sendik's (although I was prepared to grind skinned almonds as my back up plan), and while I had a minor heart attack at the price on the shelf, I sucked it up. And I'm glad I did!

While the French macaron makeover has put these cookies within reach of the home chef, they're still challenging. I have improvements to make on my next batch, but this first attempt went surprisingly well and they were absolutely, delightfully delectable.

French Macarons with Chocolate-Hazelnut Filling
Ingredients:
1 cup confectioners' sugar
3/4 cup almond flour
2 egg whites, at room temperature
Pinch of cream of tartar
1/4 cup sugar (Martha recommends superfine, but regular granulated sugar is ok too)
1/2 cup Nutella spread

Directions:
Pulse confectioners' sugar and almond flour in a food processor until combined. Sift mixture twice.

Preheat oven to 375 degrees. Whisk egg whites with a mixer on medium speed until foamy. Add cream of tartar, and whisk until soft peaks form. Reduce speed to low, then add sugar. Increase speed to high, and whisk until stiff peaks form, about 8 minutes. Sift flour mixture over whites, and fold until mixture is smooth and shiny.
Transfer batter to a pastry bag fitted with a 1/2-inch plain round tip, and pipe  into rounds 1 inch apart on parchment-lined baking sheets. (Martha says you should drag your pastry tip to the side of rounds rather than forming peaks - I had a hard time with this!) Tap bottom of each sheet on work surface to release trapped air (I apparently didn't tap hard enough because I had a few air bubbles). Let stand at room temperature for 15 minutes (I don't know why, but I did it because Martha said so). Reduce oven temperature to 325 degrees. Bake 1 sheet at a time, rotating halfway through, until macarons are crisp and firm, about 10 minutes. After each batch, increase oven temperature to 375 degrees, heat for 5 minutes, then reduce to 325 degrees (again, I don't know why, but who am I to question Martha?).

Let macarons cool on sheets for 2 to 3 minutes, then transfer to a wire rack.

Sandwich 2 same-size macarons with 1 teaspoon Nutella. Enjoy the crack of the sweet, meringue-like shell, followed by the chewy inner cookie, followed by the creamy, chocolate-hazelnut-y goodness :)